As an online student, organization is a key way to stay accountable, put together, productive, and successful. But where do you start with organization?
In this post, I’ll be going over my organization system that I’ve developed with my experience from online learning. It includes organization of your physical space, your materials, your digital files, and your time.
If you’re ready to get organizing and become a successful online student, let’s jump right into the post.

Desk Organization
If you have your own study space and your own desk, it’s incredibly important to keep your space organized; though a clean space may not necessarily guarantee a clean mind, it sure can help.
Desk Essentials
Depending on your desk’s shape and sturdiness, you can use it to hide a lot of the random items that are crowding the surface. I suggest keeping some essentials near you (either on the surface or within reach), like:
- Tissues
- A water bottle
- Your laptop
- Stationery
- Earbuds/headphones
- Sticky notes
- Notebooks you use often
- Textbooks you use often
I like to keep the larger items (like notebooks, textbooks, and headphones) in a drawer of a desk while keeping the stationery, tissues, and of course my laptop on the surface.
How To Use Space
You can also make use of the space around your desk, such as the walls or windows. My desk is put in the corner of my room, so I decided to make use of the walls around me and put a large whiteboard sticker on one side and hanging shelves on the other.
If you’re getting a new desk, keep in mind the available space, how it fits in your space, the items you like to keep within reach (they’ll have to fit in your desk), and its quality. Here are a few extra tips/recommendations:
L-shaped desks are popular (I personally prefer these even though I have a regular rectangular one), and they’re the best choice for students with multiple monitors and a lot of space.
However, regular desks have their advantages as well, as they save space and can contribute to a clean and minimalistic look in your office.
Notebook Organization
Although I am currently an online student (taking all my classes online), I still have my fair share of physical materials – like notebooks, textbooks, workbooks, and stationery – and I like to keep them organized.
What To Keep Near
The organization of my physical materials plays in part with my desk organization– I store a lot of notebooks and textbooks inside my desk. However, I only keep the most frequently used ones (some classes have online textbooks while others never even use books of any sort) near me.
I temporarily put all other textbooks and notebooks away to save space and to minimize confusion when I need to grab something I need.
How To Organize
If you don’t already organize your books, I suggest doing so now. First, organize by type. Keep your textbooks in one pile/one shelf, notebooks in another, and other miscellaneous workbooks and worksheets in another.
Then, organize by class. I keep all the textbooks together (since there are usually only 1-2 for each class), but I like to organize my miscellaneous papers by class. If you have a large number of loose worksheets and papers that you don’t often use, I suggest organizing them with an accordion folder.
You can also place and organize them on a tray paper organizer to put on your desk or on your side; this will keep them within reach while also not in 1 giant stack.
Lastly, and this is completely based on personal preference, organize everything by size. Order your books and papers by size so it’s easier to go through them and easier on the eyes.
Digital Organization
As an online student, organizing your digital files is just as important (if not even more important) than keeping your papers and textbooks organized.
My experience with online learning has consisted of many Zoom links, digital calendars, folders within folders, and the constant desire to go on YouTube. I will address all of these in this post.
Google Keep
Google Keep is a free platform anyone with a Google account/Gmail can use.
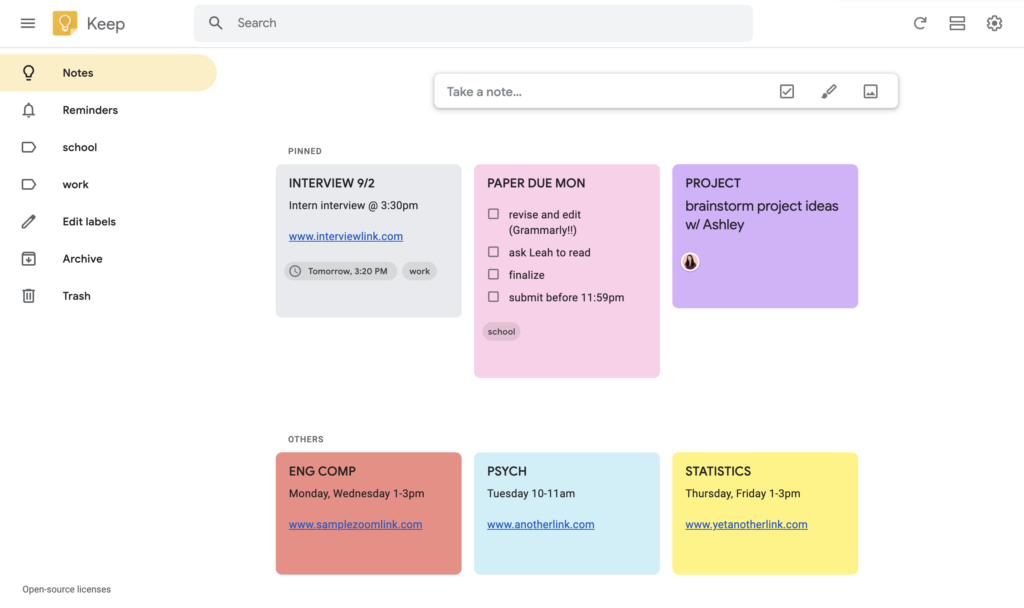
I have a different Zoom meeting link for each of my different online courses, club meetings, and other miscellaneous meetings. I save all of these in Google Keep as separate “Notes”, titling them with the class name and time and giving each class a different color.
You can also pin a note in Google Keep to keep them at the top of your dashboard; I like to pin urgent/important notes or one-time meetings so I can easily spot them.
An example of a Google Keep dashboard would look like this:
Bookmarks & Folders
If you’re not already using digital bookmarks regularly, you need to start as soon as possible. You can bookmark websites, links, files, and just about anything, and doing so saves so much time.
I’ve created multiple folders for my Google Chrome, and I often have folders within those folders to organize further. My current bookmarks consist of:
- YouTube
- Gmail
- School (folder)
- School’s website
- School Gmail
- Grade tracker
- A folder for each class that consists of important links like the professor’s website, the homework calendar, and online textbook links.
- Learning (folder)
- Duolingo (language-learning tool)
- Links to online courses I’m taking
- Other miscellaneous resources
- Google (folder)
- Google Drive
- Google Docs
- Google Slides
- Google Sheets
- Work (folder)
- Important links for my part-time job
- Miscellaneous (folder)
- Miscellaneous links and files
I find this format super useful, so feel free to reference it!
Tab Organization
On Google Chrome, you can create Tab Groups to organize and collapse/expand groups of open tabs. This could come in useful when you’re doing a research paper or project, or when you’re multitasking.
No matter how you use it, the feature is super handy for any computer user. Here’s how it works:
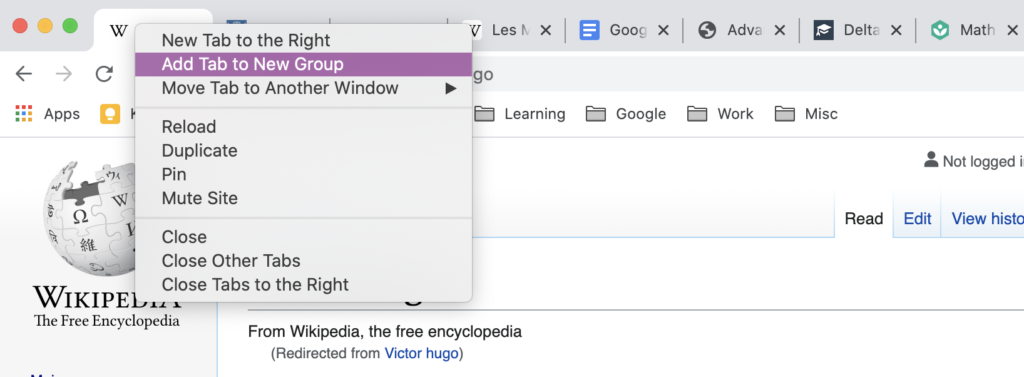
As you can see, I have many tabs open. To create a tab group, simply right click on a tab and select Add Tab to New Group.
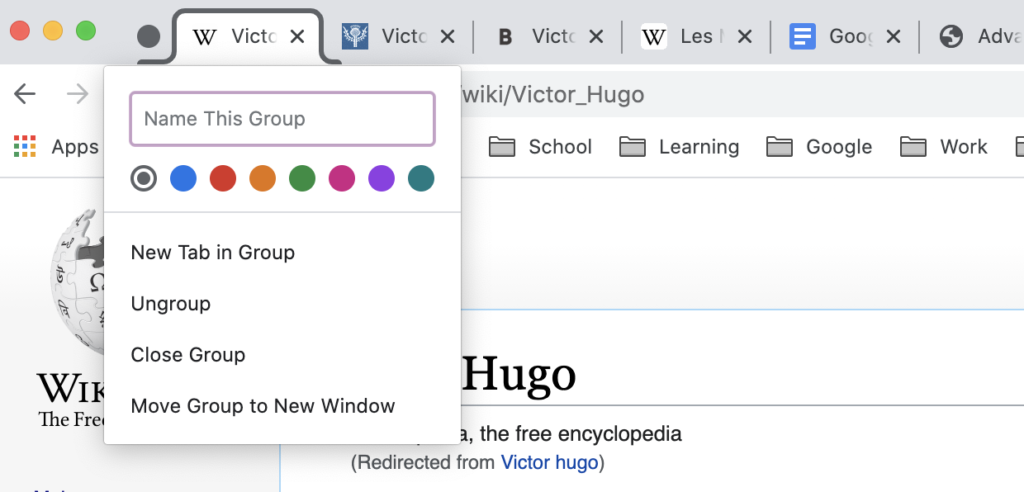
You’ll then be able to name your tab group and choose a color for it.

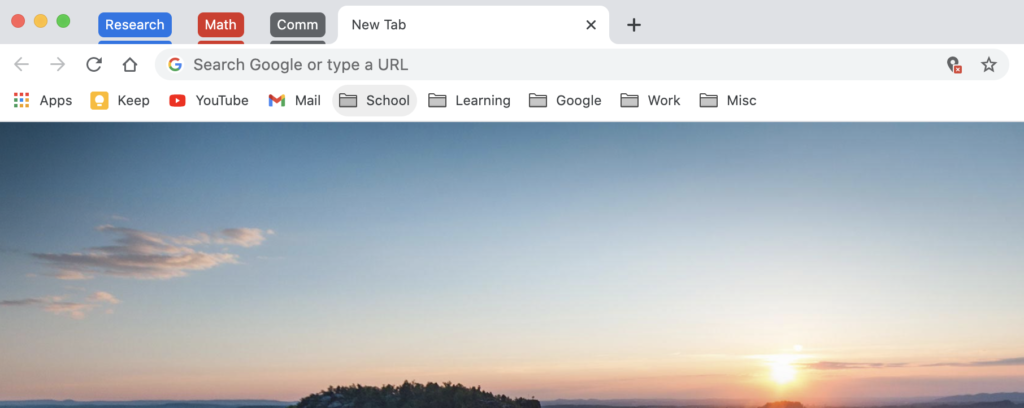
Here, you can see that I’ve grouped my tabs in 3 groups. I can then choose to collapse/expand each group as I wish (simply click on the name of the group), hiding and showing the tabs accordingly. Here’s what the groups look like when collapsed:
Distractions
Lastly, a way to manage distractions. With your laptop right in front of you and no one to stop you from going on a different website, it can be tempting to open YouTube or Netflix and “multitask” during a lecture.
The easiest and most straightforward way to prevent this is to download a Chrome extension like BlockSite or Forest.
These extensions will allow you to “blacklist” certain websites (like YouTube, Instagram, and Netflix…) and will stop you from accessing them when you are focusing. It’s a simple yet effective way to prevent distractions.
However, it’s also important to tackle the root of your problem, which is learning how to stay focused and productive in all environments. Blocking distractions will not always work, which is why you need to start building good habits to truly become productive.
YOU’LL LOVE THIS POST: 23 Habits To Skyrocket Your Productivity
Planning System
Last but not least, I have a specific planning system that I use to plan and organize my time. If you’re a student who struggles with procrastination and time management, try using a planner system!
I like to plan using both digital and physical materials. I time block every day with the calendar on my laptop and write to-do lists and other notes on my physical planner.
Time Blocking
Every evening, I take a few minutes to plan out the next day. Although I may not follow this schedule perfectly, it gives me a structure to my day, which helps me stay productive and not procrastinate.
Here’s an example of what my time-blocked week looks like (different categories are in different colors):
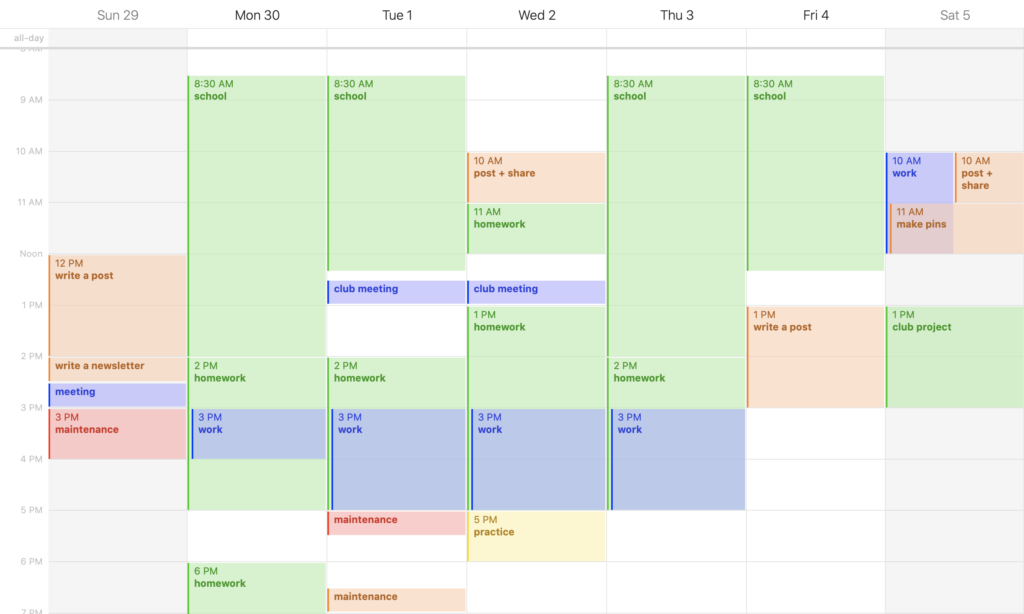
As you can see, there are blocks of time where I have nothing planned. This is to give myself flexibility in my time, as some tasks may take longer than expected, or I may feel the need to take a long break.
Timeblocking is a great way to plan ahead, stay accountable and get the most done. You can do this with any digital calendar (I like Apple Calendar or Google Calendar).
Planner
I also love using a physical planner, as it’s personally a great stress reliever. I’ve tried bullet journaling, and although it was fun, I found that it took too much commitment. Therefore, I’ve resorted to using a simple, daily planner.
In my daily planner, I create to-do lists for every important task I need to do (like homework, projects, work, blog maintenance, practice…), as well as mark important dates and appointments. I also tend to jot down notes about the day’s events if I feel that they were significant.
If you want to go the extra mile, the Ultimate 3-in-1 Student Planner might fit your taste. This planner, made by yours truly, consists of over 40 pages of unique layouts that are perfect for students.
It includes academic planners, goal planners, daily/weekly/monthly planners, productivity and self-care planners, and everything you need to get your student life together. Check it out below!
Conclusion
And that concludes this guide about my organization system as an online student! I hope this look into my system was able to give you a feel of how to get your life together during online learning.
Leave a comment with the one thing you struggle the most with during online learning, and I’ll try to help you solve it! Meanwhile, if you’re looking for more posts like this, check these out:
- The Ultimate Guide To Studying From Home
- 10 Brilliant Habits To Organize Your Entire Life
- Ultimate 5 Day Guide To Become Insanely Productive
