So you want to start a blog.
You’ve read case studies and income reports, and seen the potential of earning some big bucks by blogging. And it’s true!
If you start a blog the right way, you could possibly earn hundreds, thousands, or even millions of dollars. Of course, the key here is the right way.
In this guide, I’ll walk you through the step-by-step process of creating a successful blog. No coding, no thousand-dollar investments, no BS.
Grab some snacks and get comfy, because this is going to be a long read! And don’t feel the need to read this and complete all the steps today. Bookmark it so you can easily reference it later!
Blog Basics
What is a blog?
Here’s my definition:
A blog is your own little school on the Internet where you regularly provide content that educates or entertains the reader.
Your blog doesn’t have to be unique or mindblowing. It’s simply a platform to attract the right readers, connect with those readers, and earn money from them (it’s not as evil as it sounds, I promise. I’ll get into this later).
Why start a blog?
As a college student, I value flexibility and profit. Blogging is a slow but sure way to make money online, and it’s very fluid. I get to enjoy the freedom that blogging gifts me, which is crucial as a busy student. Even if you’re not a student, blogging is a relatively easy side job to pick up.
And the best thing?
You don’t have to be a professional writer or website-builder to be a successful blogger. Your job is to create content that helps the audience. As long as you do that, you’re set to succeed.
How long will it be before I make money?
This is the question that brings many bloggers down. Out of the 700+ million blogs on the Internet, most fail. And it’s not just about their content/promotion strategies.
The first weeks, months, and even years of blogging are hard. I’ve gone through the exact process.
I wrote a blog post almost every. single. day.
I went on Pinterest and promoted the heck out of my posts.
I signed up for affiliate programs and put links everywhere.
But no money was rolling in! And that’s okay. It’s completely normal to not earn any money when you first start. Even if you’re starting to see traffic growth, don’t expect to see much income yet.
You will have to be patient.
Most bloggers don’t see substantial income until 12-18 months after they start their blog and publish content consistently. If you’re ready to face that, you’re already 10% there in the blogging game.
My Story
Who am I to tell you how to start a blog?
Let me introduce myself. My name is Ellie, and I’m a student blogger. I started a casual blog in high school with Blogger (newbie mistake!) but quickly transitioned to a more business-focused blog.
And thus, Sincerely Students was born.
I’m going to be completely honest. My goal with this blog was to earn money. Sure, I’ll give my advice to all the students out there and try to help them overcome their struggles. But my main purpose was to start a business.
And I’m glad I chose that route. Treating your blog as a business is one major aspect of success. I was willing to spend hours creating posts, maintaining my blog, learning new things, promoting my content, and creating sales opportunities.
And I think it paid off!
In only 1 month, my new blog had received over 10k visitors and almost 12k sessions. That’s crazy!
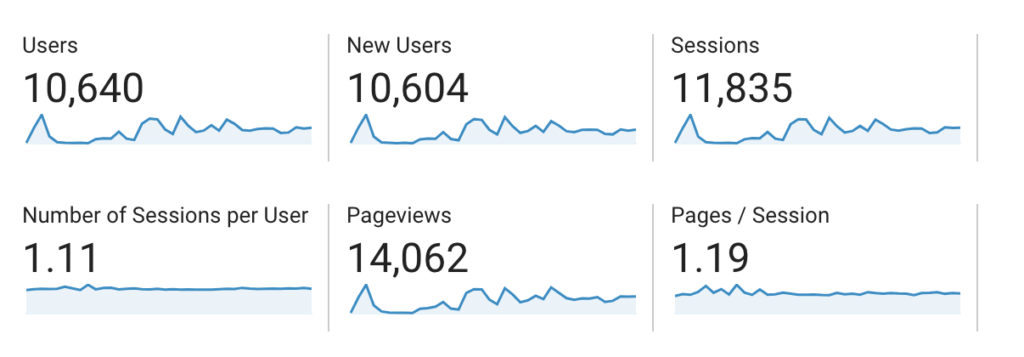
As a beginner blogger, getting past 100 sessions on your blog is amazing and very encouraging. After all, a lot of new bloggers don’t earn any money even after a year of blogging (and I made about $10 in the first month!). I studied and strategized, and I’m going to teach you how I did it.
Mistakes I Made
I made plenty of mistakes on my first blog. Although it was a casual hobby to start, I was regularly pumping out content and hoping to see income. That didn’t happen. And it’s no surprise, considering these mistakes I made:
- I created the blog on Google’s Blogger platform
- I didn’t make any investments (domain, hosting, theme, courses..)
- My niche was all over the place
- I pinned too little and repinned too much on Pinterest
- I tried to implement too many income streams
And that’s just a small part! Don’t worry, I’ll go into detail on all of these in this guide. Keep them in mind and let’s keep going!
Step 1: Choose A Niche
If you don’t know what a niche is, it’s basically the main topic you’re going to be covering on your blog. Depending on your passion and expertise, you can choose a broad niche or a specific one.
Choosing a niche is very very important for multiple purposes: building the right audience, ranking in Google, and finding profitable income streams,
If you are reading this guide, you might want to start a student lifestyle blog. And that’s a wonderful place to start! You can write about studying, productivity, and general tips like dorm room tips or choosing classes.
However, if you haven’t decided on a niche yet, keep reading.
Profitable niches
If you want to earn money from your blog, you cannot write whatever you want. Many new bloggers make this mistake, and their blogs turn into diaries. Doing this won’t earn you any money, because there will be no audience attracted to your blog.
Instead, your blog has to focus on something you know people are searching for help about. Some niches have very high and consistent search volumes, which means that blogs within those niches are getting high and consistent traffic.
Here are some examples:
- Travel
- Food
- Making money online
- Parenting
- Pets
- Personal finance
- Fashion
- Lifestyle
- Productivity
These niches are profitable because the audience in these niches are always looking for solutions to their problems, and are almost always willing to spend money to solve them.
Is my niche too broad?
if your niche is too broad, you will have trouble growing your blog and your income.
Because your blog talks about a wide variety of topics, you’re not attracting a targeted audience. You’ll be drawing in all types of readers, but none of them will care about 80% of what you post. This means a lack of loyal readers and a lack of sales opportunities.
You’ll also have trouble getting in or earning from affiliate programs. Affiliate programs like to see blogs that have the potential to bring in targeted audiences and might reject your application if they don’t think your blog will be worthwhile.
Lastly, your blog will literally never rank on Google unless you manage to build it to something like Buzzfeed. Google likes to rank experts of a field, which is why you never see baking blogs ranking for “how to cook steak”. Becoming an expert in a specific niche is way easier than becoming an expert in a broad niche, where you have 6-12 sub-niches.
But how do you know if your niche is too broad? Here’s the short answer: it’s too broad if the readers of one post have absolutely no interest in another post.
For example, my readers are generally high school or college students looking for tips on productivity or getting good grades. If I suddenly started blogging about cats, they would leave my blog and probably never come back. And it’s not because they hate cats. It’s simply because they want to learn how to write better essays, not how to trim a cat’s claws.
Step 2: Blog Foundation
Choose a domain name
Your domain name is the URL of your website and usually the name of your blog. For example, my domain is sincerelystudents.com, and my blog’s name is Sincerely Students.
Choosing a blog name can take a while, especially if you’re indecisive. Here are some tips on choosing one you won’t regret:
- It should be somewhat related to your niche.
- It should be easy to remember and say.
- It should not be a play on spelling.
- It shouldn’t be longer than 20 characters.
Having a good domain is great for SEO and promotion. Meanwhile, having a meh domain could lead to low traffic or even no traffic!
Let’s imagine this:
Bob decided to create a student lifestyle blog “based off” of mine and also named it Sincerely Students (this is just for explanation purposes; don’t do this).
Obviously, this domain is taken, which means that Bob will have to change up the domain. He decides to buy the domain sinserelystudents.com. You see what Bob did there?
Although Bob is perfectly able to buy this domain and use it, there are some things he forgot.
First, he stole my intellectual property.
Second, this domain is very easily confused with sincerelystudents.com. This means that his readers might type in that URL into Google instead of Bob’s, and they would land on my blog.
Lastly, this domain has a play on spelling, which means that if someone was to share his blog in real life to a friend, there’s a high chance that they’ll be led to my blog.
Although I would appreciate those referrals, Bob would be losing quite a number of readers.
So when you’re picking a name for your website, make sure to be unique and choose an available domain (aka not registered with another website).
You can get a FREE domain for 1 year if you choose Bluehost as your web hosting (read more below). So don’t buy your domain just yet!
Choose a platform
You may be wondering what a platform is.
A blogging platform is usually a software that lets you manage your blog and publish content. Most blogging platforms are free. However, some will let you self-host your website, while others don’t.
Here are some of the most popular blogging platforms:
- WordPress.com
- WordPress.org
- Blogger
- Wix
- Squarespace
You can start a blog on WordPress.com, Blogger, Wix, and Squarespace right now for free, but there are a whole lot of disadvantages to doing that. The most obvious is the lack of a professional domain.
I started my first blog on Blogger for free, without buying a domain nor hosting. This meant that my blog URL was something like myblog.blogspot.com. Uhhhhhh.
Would you trust that I was a professional blogger who really knew what I was talking about if my domain wasn’t even my own?
The more important downside, however, is the lack of freedom due to your blog being hosted by the platform itself, on its own servers.
When I say hosted, it basically means where your blog “lives”. You want to have a self-hosted blog– one that “lives” in your own control and follows your rules. If you create a blog on WordPress.com, Blogger, Wix, or Squarespace, your blog “lives” in their servers and follows their rules.
This means:
- You have less freedom over website design
- The amount of display advertising will be restricted
- Affiliate programs will be harder to join
- Your blog can be deleted at any moment
You don’t want that to happen. It means no traffic, no money, and maybe even no blog.
Luckily, there’s one platform you can trust, and that’s WordPress.org. (Note the difference between WordPress.com and WordPress.org!)
The platform is free, and all you need is hosting. Once you have that done, you’ll be able to create content, edit the design, monetize, and basically do whatever you want with your blog, right on WordPress.
Sooooo, where do I get hosting?
Buy hosting
If you’ve decided that you’re going to start a blog on a tight budget, then hosting is the only investment you have to make (for now). But no matter what type of budget you’re on, hosting is a must!
Remember, a self-hosted blog means one that “lives” in your control and follows your rules. It also means one that will actually be able to grow and earn money.
So how much does hosting cost?
It depends! Some web hosts charge less than $5 a month, while others can reach up to the hundreds. Obviously, we want to start with the cheap and reliable one– aka, Bluehost.
Why I Chose Bluehost
- It’s the #1 recommended web hosting service by WordPress.org
- It’s the cheapest hosting for bloggers (only $3.95 a month!)
- You get a free domain for 1 year (usually around $15)
- You get your own email address (like [email protected])
- It installs WordPress for you quickly & for free
Are you ready to set up your blog for success? Here’s all you need to do:
1. Go to Bluehost and click Get Started
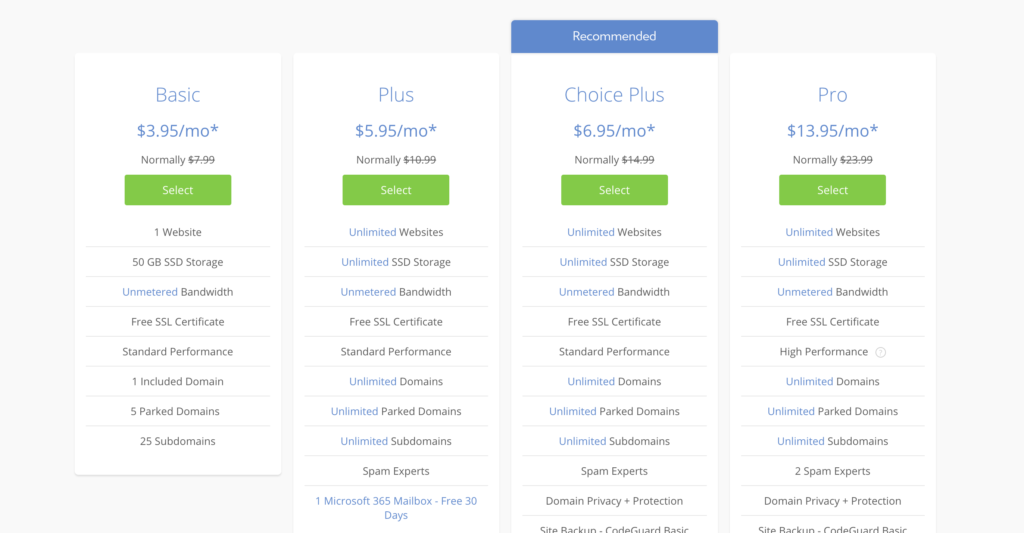
2. Select a plan
The Basic plan has everything you need and is the cheapest, so go with that.
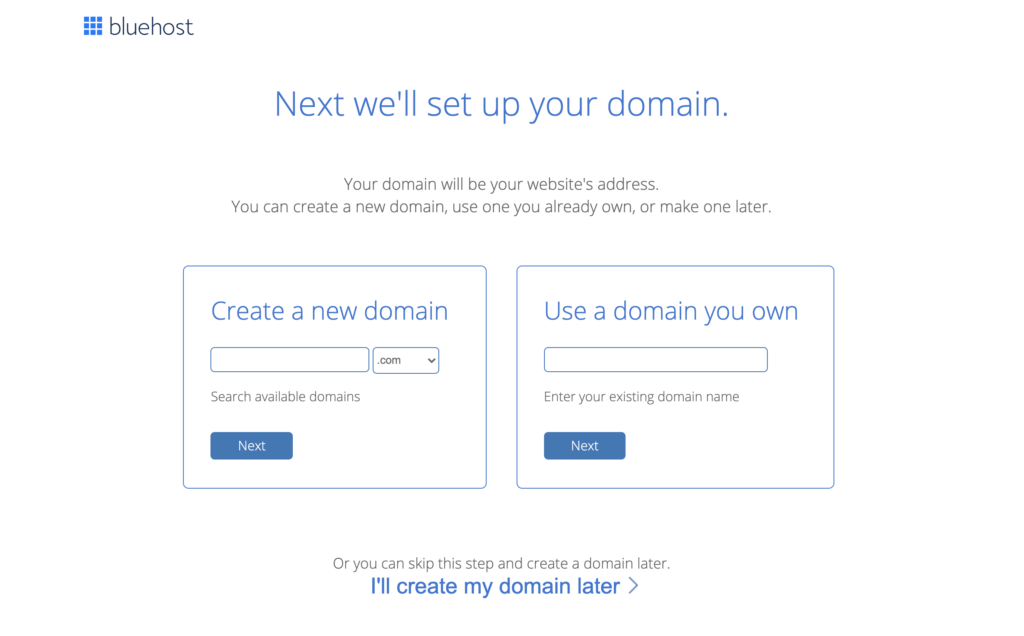
3. Enter your domain name
Remember that this is FREE, so take advantage of it now!
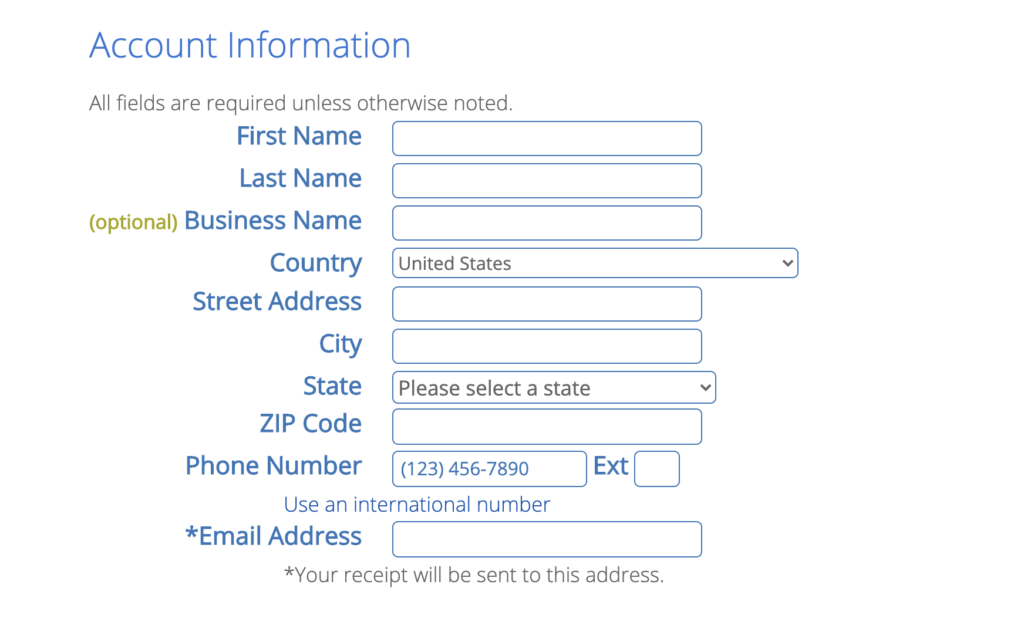
4. Enter your Account Information
5. Choose the Package
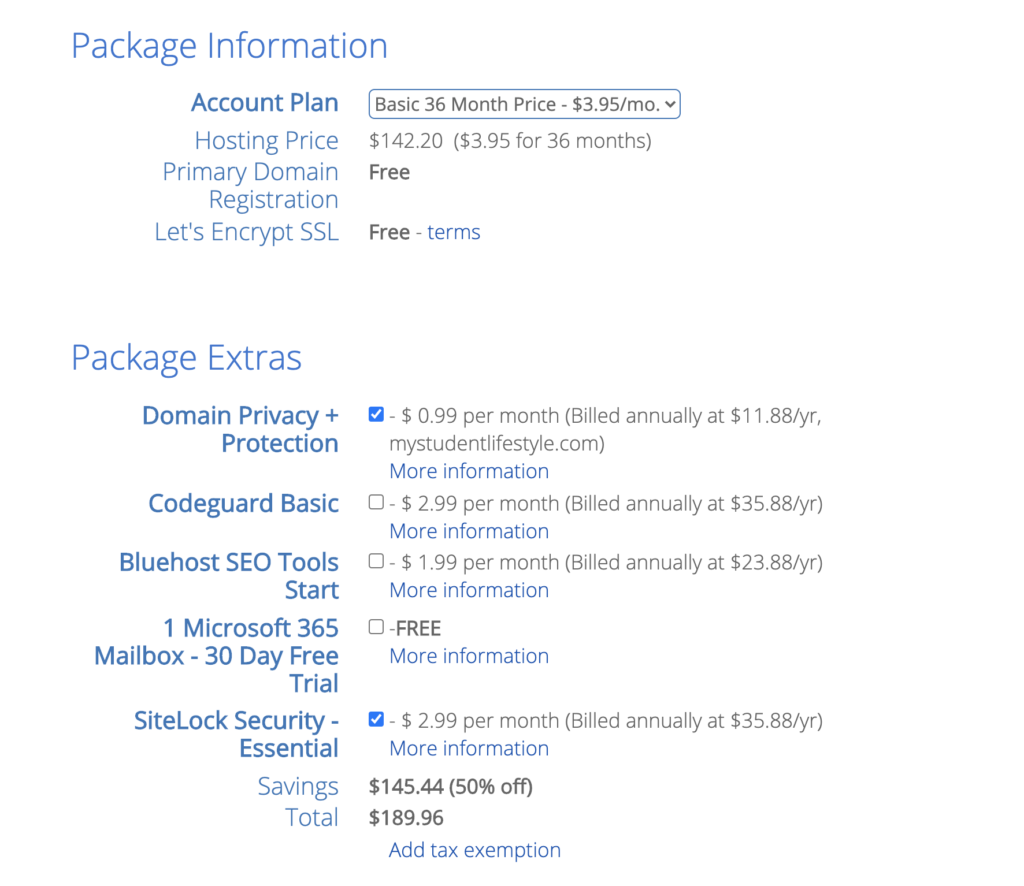
I suggest going for the 36-month plan, simply because it’s the cheapest. If you’re really not sure if you’re going to be blogging a year from now, then choose the 12-month or 24-month plan.
I also highly suggest getting the Domain Privacy + Protection extra. When you own a domain, your information (like phone numbers and email addresses) will be open to the public. In order to keep that private, you have to buy Domain Privacy (which kind of sucks, but it’s worth it).
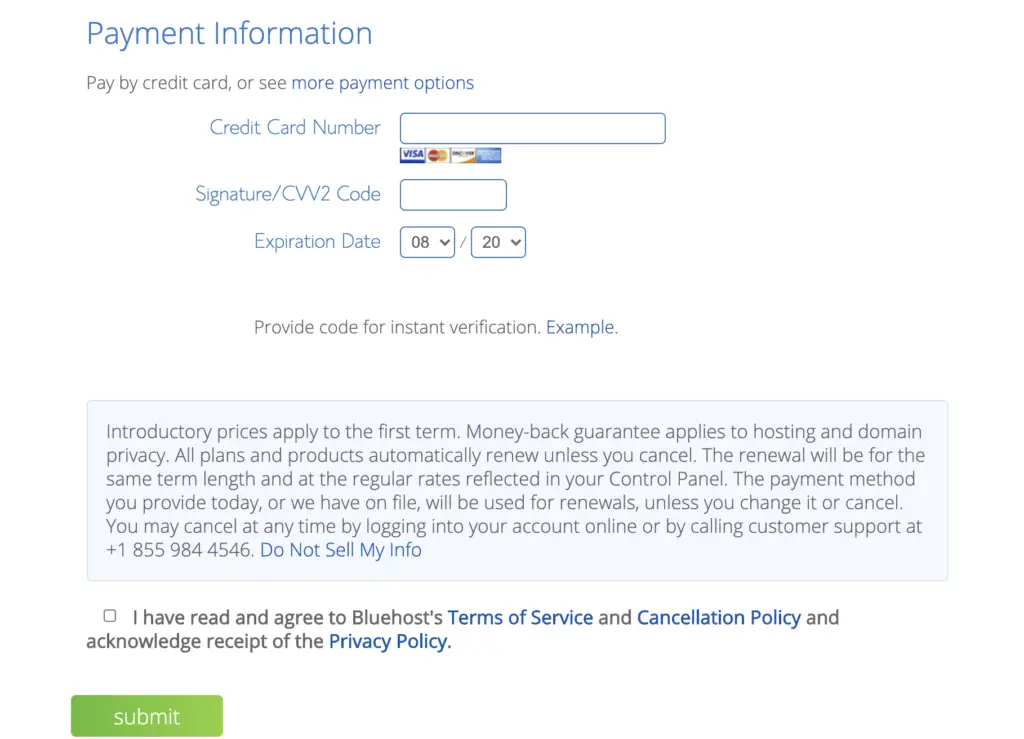
6. Enter Payment Information
Lastly, enter the method by which you would like to pay. Once that’s done, just click submit and you’re good!
Bluehost will now automatically install WordPress for you, so you’re ready to go on to the next step!
Purchase a theme
When you first open WordPress, it will likely ask you to choose a theme. You can choose any of those themes, but I’ll advise you to skip this step and instead, use a third-party professional theme.
Choosing a good theme can take a lot of time, especially when you’re new. But here are a few essential points you need to keep in mind when selecting a theme:
- Ease of use. This is crucial. And I don’t just mean ease of your use. Always keep in mind what your readers are seeing! If you have bright yellow fonts and fancy calligraphy everywhere, your reader is going to leave your site ASAP.
- Mobile-friendliness. Nowadays, more and more people are dependent on their mobile phones. Not many people read blog posts on their computers anymore. This is why you have to make sure your website is responsive, which means that it looks great on all sizes of screens.
- SEO optimization. A clean menu is usually a key measure of SEO. But other than that, make sure to read your theme’s small print! Some third parties create beautiful themes that are terribly coded, which usually means bad SEO.
- Support. Lastly, make sure the theme’s creators offer support of some kind. If your theme suddenly breaks, you need to have someone to get help from.
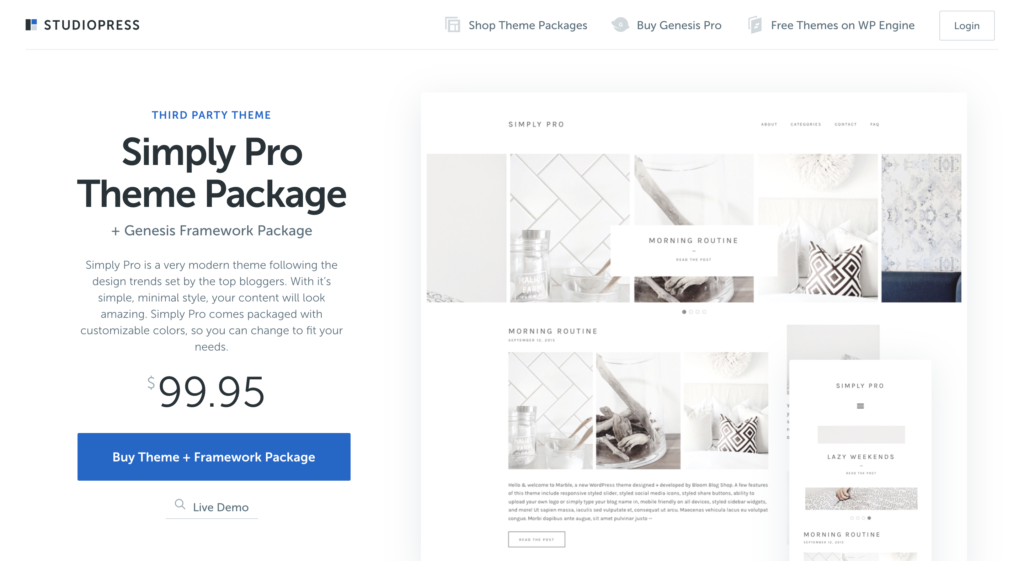
Here on Sincerely Students, I use a combination of the Genesis Framework and a child theme, Simply Pro. Both are from StudioPress, a professional service that creates themes for WordPress websites!
What is a framework?
The Genesis Framework is the “body” of your website. The skeleton, muscles, and skin of your blog. All the basic necessities of your website’s aesthetics will be coded in the framework, including formatting, security, and SEO.
What is a child theme?
A child theme, like Simply Pro, is the “outfit” of your website. It’s the dress, accessories, and all the pretty things you add. You’ll be able to customize this however you’d like, such as changing layouts, colors, sizes, logos, and more.
Simply Pro
This is the child theme I chose for my blog. It’s minimal and easy to navigate, and perfect for bloggers who like simplicity. And the price tag is extremely generous. You can get the Genesis Framework + Simply Pro for only $99.95. Compare that to $249 of Divi (another theme service many bloggers swear by, but is just too expensive for someone like me).
Set up the theme
Setting up the theme on your blog is super simple! Once you purchase the theme, you will be directed to a downloadable file. Download that to your computer and upload it to WordPress themes.
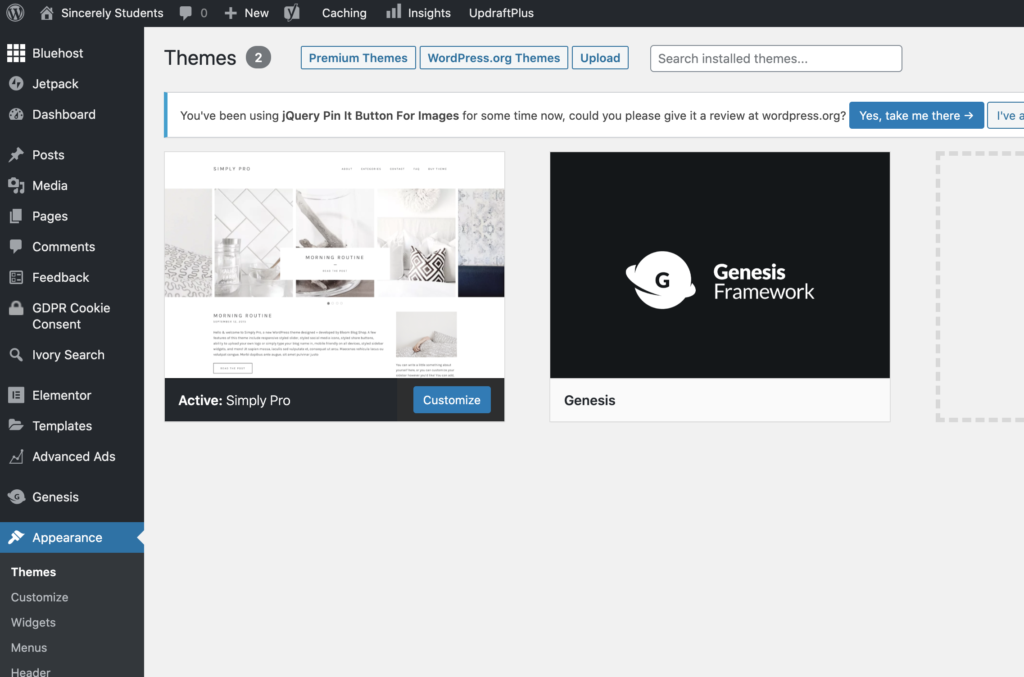
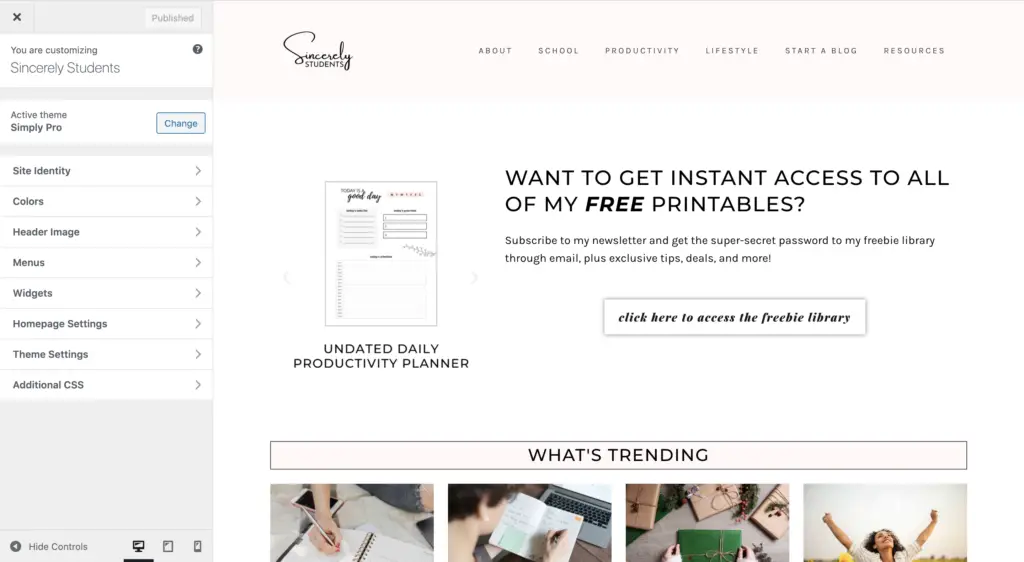
Once it’s uploaded, you can customize it in Customize. You’ll be able to edit the logo, favicon, header, menus, CSS, and just about everything design-wise.
Install plugins
Last but certainly not least in Setting Up Your Blog, you need plugins.
All you have to do to install plugins is to go to Plugins – Add New and search for the plugin.
Note: you also have to click Activate after installing, or it won’t do anything!
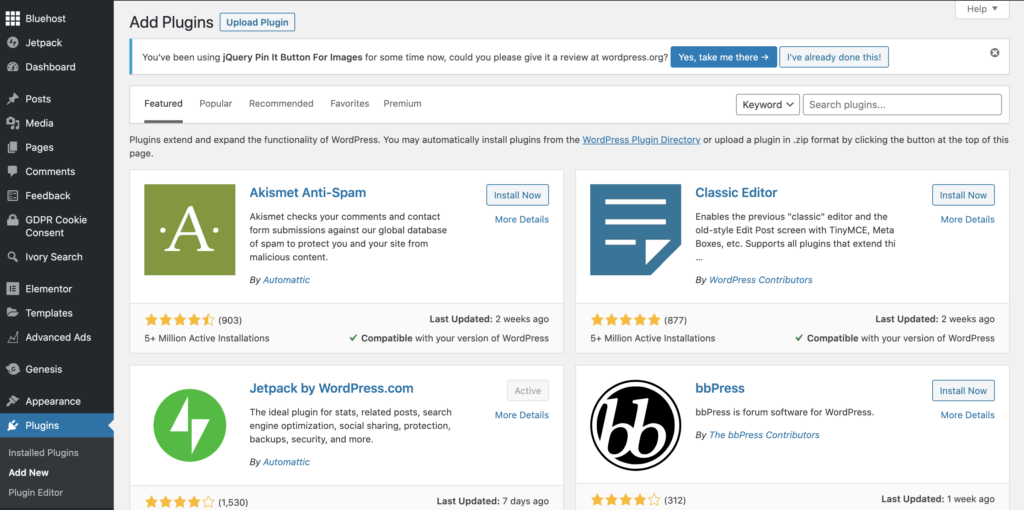
Most WordPress plugins are free, but you have to be careful not to install too many. Too many plugins will slow down your website because of all the excess code that’s functioning for no reason.
Here are a few plugins I highly suggest you install ASAP:
Yoast Seo
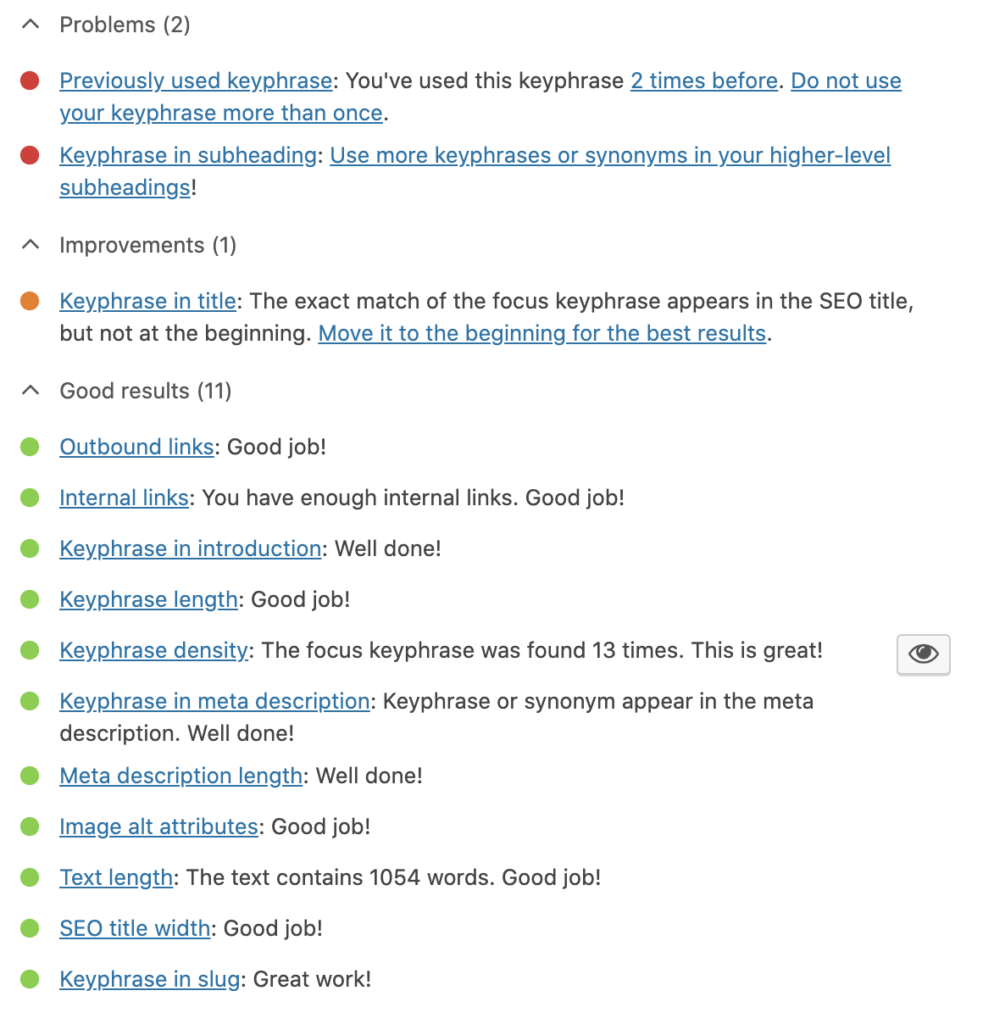
You can easily set up your Pinterest optimization here, as well as automatically submit a sitemap for Google Search Console. It’ll also help you optimize each post for SEO by giving you green lights.
UpdraftPlus
You never know when your website might crash, or when a hacker might get into your website. In case of something like that, you should always have a backup file of your blog downloaded. UpdraftPlus will download it automatically at intervals of however many days you choose.
Smush
Large images are a big no-no in the blogging world. They will slow down your website massively, which means a higher bounce rate from your audience. Smush will automatically compress your images without sacrificing quality.
Grow by Mediavine
Having share buttons on your posts is super important in “passive” promotion, because your audience will be more likely to share it. Grow is simple and works well, and is free!
GDPR Cookie Consent
You’ve probably seen the We use cookies banner on almost every website you use. You’re going to need one, too! As soon as you implement Google Analytics and affiliate links, you’ve put cookies on your website. For legal purposes, you need to disclose that. This plugin makes it super easy to do so.
Easy Table of Contents
Having a table of contents is not only helpful for the audience, it’s good for SEO. Search engines will see that your post is easy to navigate and will be more likely to rank it.
MonsterInsights
This plugin is the easiest way to connect Google Analytics, which is how you’re going to track your traffic. It was recently updated to include a Headline Analyzer, which you’ll read about in Step 4.
Set up your email
The last task you have to do is set up your email. As I mentioned before, Bluehost gives you your own email domain for use. You should definitely set it up and use it because it will help you organize all your files and make you seem more professional. Here’s what you do:
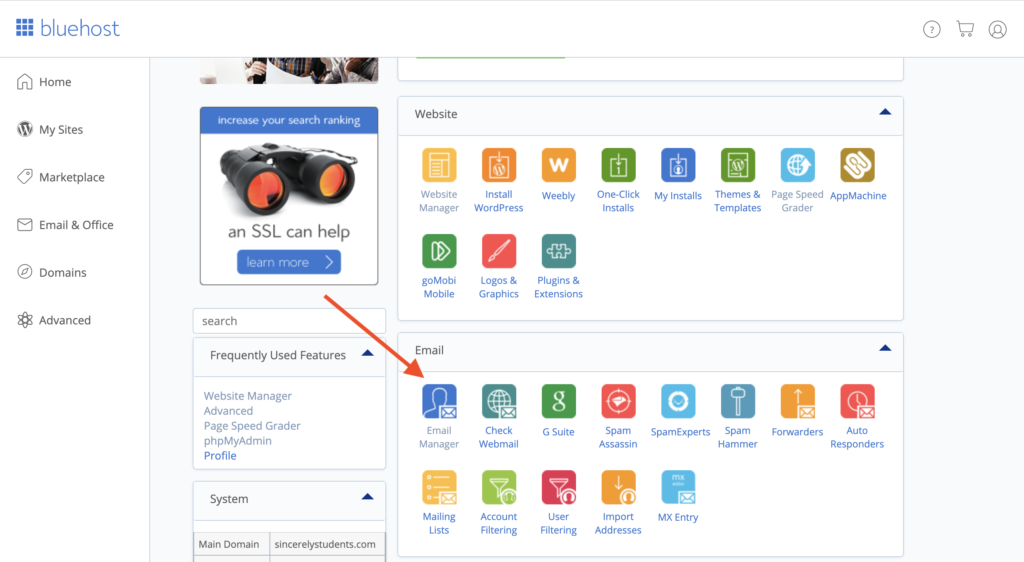
First, sign in to your Bluehost dashboard and open Email Manager under Email.
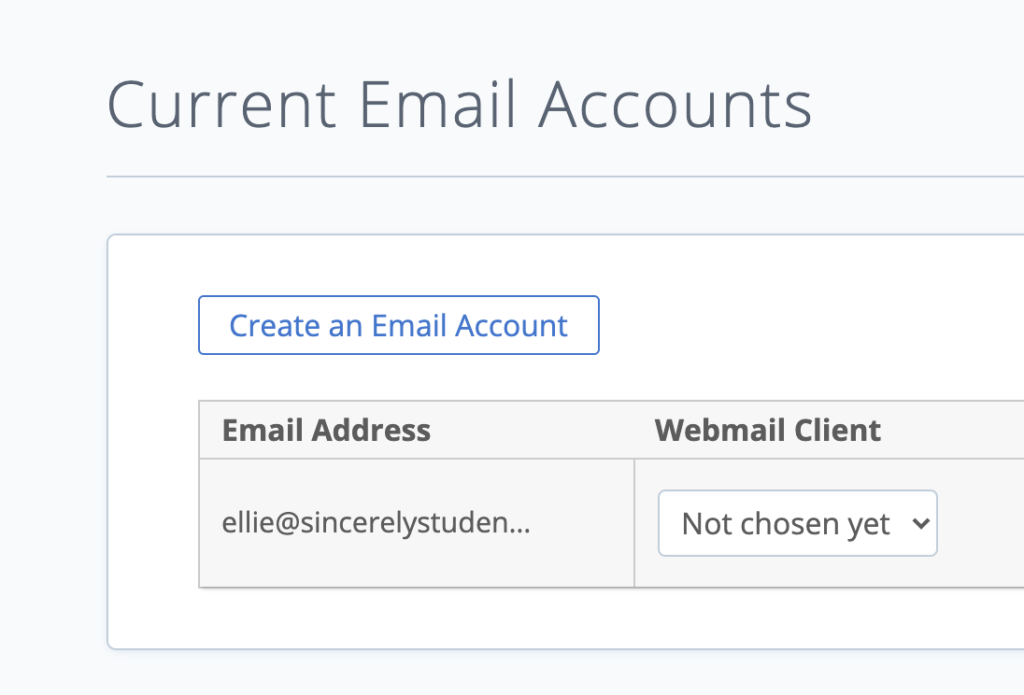
Click Create an Email Account.
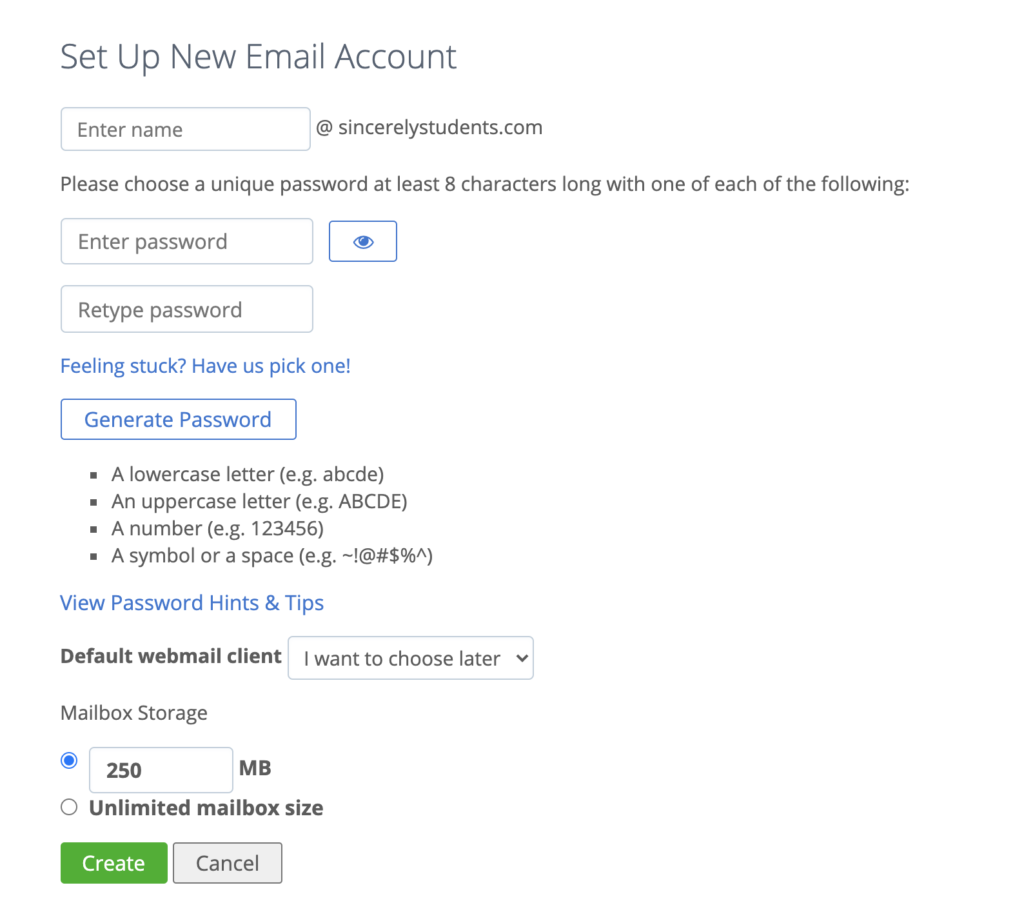
Now, set up your new email!
Once your email is set up, you can connect it to whatever inbox you use and start sending and receiving emails from your new and professional address!
Step 3: Essential Pages
Homepage
This is the first page your readers land on (other than individual posts), and you have to make sure they stay on your blog! Generally, a good homepage should have these things:
- A little about yourself and your blog
- Some of your posts (usually your most popular ones)
- A call to action (such as visiting a post or signing up for a freebie)
Take a look at my old homepage below. I’ve since changed it to a simple feed homepage, but I used this static homepage for many months.
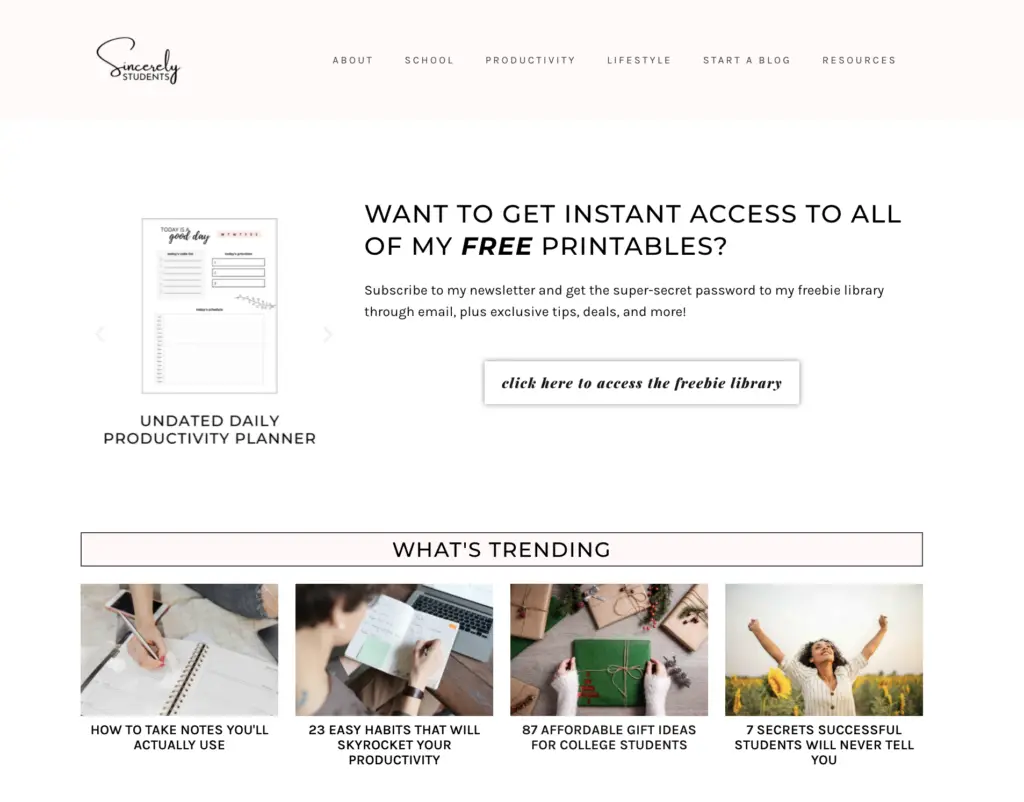
The first thing you see is a freebie opt-in (this is an email marketing trick, which I’ll talk about later). I offer a Freebie Library for my subscribers, from where they can download digital planners, templates, and more.
Next, I place a couple of my recent and popular posts. My readers will see them and (out of curiosity) go on to read one of them, which is exactly what I want them to do.
Then, I go on to tell a little about myself and the blog. I also include the link to my About page so they have somewhere to go if they’d like to learn more.
Right before the end of the page, I have a subscription form, which would give them access to my Freebie Library.
Lastly, I have my social media: Twitter, Pinterest, and Instagram (and my email). This will give my readers the ability to check out my socials and follow me!
About Me page
Your About page is just about the most important page in your blog.
If your readers enjoy your content and want to learn more about you, they’re going to visit your About page.
If a brand is interested in working with you, the first page they’re going to check is your About page.
All in all, it’s the only page on your blog that’s really all about you. You want to be 100% genuine and honest because you want your readers to feel that they’ve made a new friend after reading your About page.
Here are the basics of what you should include there:
- Who you are: a little background such as age and where you’re from, as well as why you started your blog.
- What your blog’s purpose is: who you’re trying to help, how you’re trying to help, why you want to help.
- Link to your Contact page: this is just to let your readers know that you welcome their messages and want to be friends!
Contact Me page
Before I started my blog, I had no idea what purpose Contact pages served. I mean, why would anyone want to talk to a stranger on the Internet?
Once I started my blog, I realized that my beliefs had been mistaken. If a reader genuinely likes your content and likes you (based on their judgments of what and how you write), they’ll want to reach out to you and send a little note or ask a couple of questions.
And as I mentioned before, brands and companies might be on your blog, too! If they’re interested in hiring you, there must be some way for them to contact you. If they can’t find a Contact form or an email, they’ll just say “oh well!” and move on to the next blog! You don’t want that to happen, do you?
Making a Contact form is super easy. You don’t need a plugin for it. You can embed a form right on the Gutenberg WordPress post editor. Just type in /contact and you’ll see a Contact Form option. Click that and tweak some settings (like which email the message should be sent to), and you’re all set!
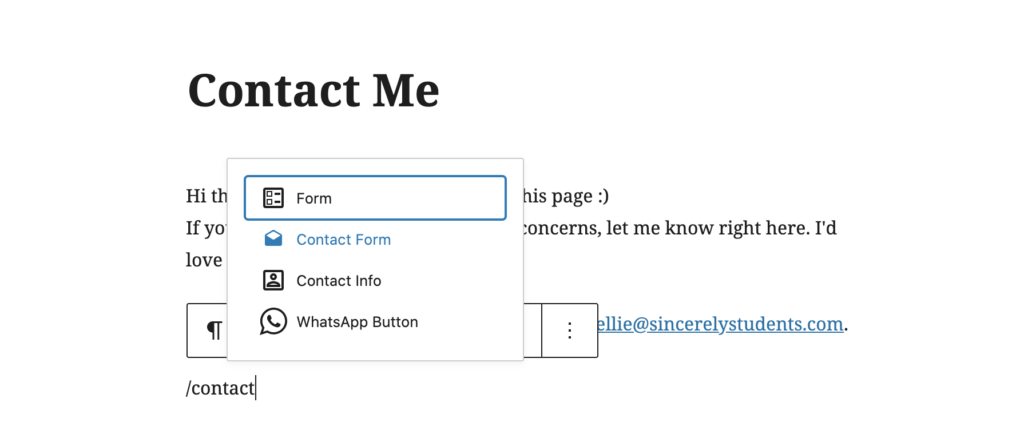
Once you make your Contact page, go ahead and link it to your menu, sidebar, and/or footer. Make sure it’s easy to find!
Legal pages
Last but certainly not least, legal stuff.
Some bloggers have gotten in trouble with the law and lost a whole lot of money, simply because they were missing these pages: a Privacy Policy and a Disclosure/Disclaimer.
Privacy Policy
If your blog collects any information from your readers, you need to have a Privacy Policy page. And if you’re a blogger, you definitely collect information.
If you use Google Analytics, there are cookies placed on your readers to track where they’re coming from and how long they’re staying (along with other information).
If you join affiliate programs and place links in your blog, there are also cookies being placed on readers to track their purchases.
If you use email marketing services and have an email list, you’re collecting subscribers’ names and emails.
If you sell products, you’re collecting names, addresses, credit card information, and a whole lot more.
Basically, you must have a Privacy Policy, even if you think you don’t need to. Readers will be able to reference this policy if they ever feel that their personal information is being collected for questionable use.
It’s super simple to create a Privacy Policy page on WordPress. Just go to Settings > Privacy > Create New Page. You can also check out the WordPress guide if you need a little help.
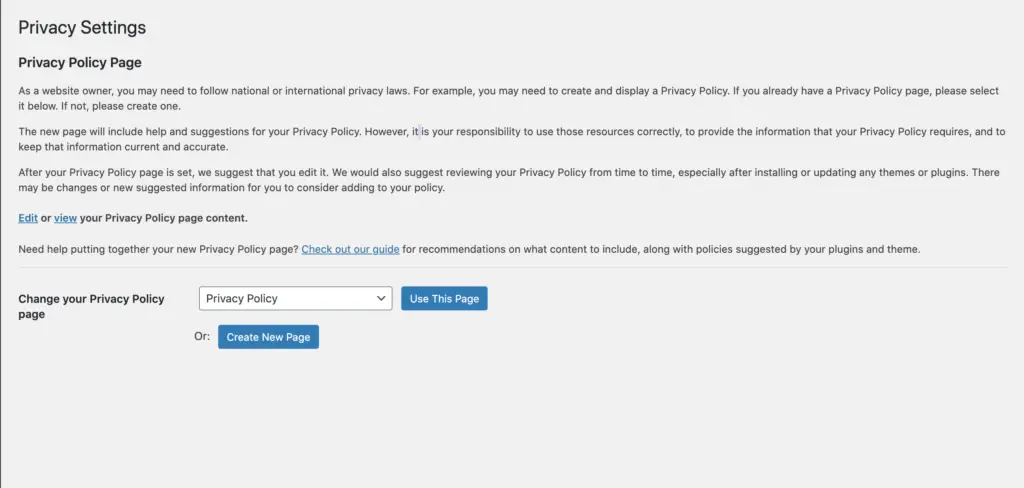
Disclosure/Disclaimer
A disclosure is slightly different from a Privacy Policy. The FTC requires (by law) that blogs must have a Disclosure page to ensure that readers of your blog understand that you can not be held legally responsible for the content you publish.
This means that if you publish some Personal Finance advice and one of your readers follows your advice and ends up losing money, they can’t sue you for it.
The Disclosure also explains that you are getting paid to say certain things in some posts (usually due to affiliate links or sponsorships).
For example, if I was writing about a product that I’m an affiliate of (meaning I earn some part of the total commission if my reader buys it through my post/link), I must disclose that I am an affiliate of the product.
If you get paid for whatever you’re writing, you must disclose it.
One more thing: just having a Disclosure page is not enough. In every post/page that you include affiliate links or sponsored messages, you must have a disclosure at or near the top of that page. You scrolled past one right on this post!
Terms and Conditions
A Terms and Conditions page is actually not required by law, so you don’t need to have one (I don’t!). Its main purpose is outlining what your readers can do with the information they find on your website.
It covers topics like copyright, community standards, use restrictions, sharing limitations, etc.
I’m not a pro either, so check out this post from GoDaddy to learn more.
Step 4: Quality Content
Woop woop! Your blog is all set up! This means that you’re almost ready to reveal your blog to the world!
But before you launch your blog, there’s something you need to do. Imagine your blog as your unborn baby. For months before your baby is born, you feed it and take care of it so that your baby will be the cutest baby once it’s born!
It’s the same idea for your blog. Before launching, you need to prepare it by writing 15-20 posts. This will allow you to have something to promote after you launch and make you seem more professional than you really are! It’ll also be a huge shortcut towards starting to monetize your blog.
But… how do you write posts?
Every single post should be its best so that it can remain evergreen (relevant and helpful forever); even before you launch, you need to be writing quality content. While it does take practice to find your style and approach, here are some basic ideas you should be implementing from the very start.
Target audience
Your target audience are the people who read your posts and are genuinely interested in what you recommend doing and buying. You want to attract more of these people because they are more likely to keep coming back to your blog! Also, each one of them is a possible sales opportunity.
When you chose your niche (especially if it was specific), you’ve already chosen an audience. For example, if your blog is all about cheap makeup dupes, then your targeted audience would likely be young women who are into makeup but don’t earn enough money to splurge on makeup. These readers would be more likely to buy something you recommend than a general reader– say, the father of a newborn baby.
After you’ve identified your target audience, you need to curate your posts and opt-ins just for them. You’ll need to find out what type of questions they want answered and write posts that solve their problems. This way, they see that you are always providing relevant and useful content and will keep coming back to your blog!
But how do I find out what my readers want?
This might take a little bit of trial-and-error.
When you first start, you don’t have much of an audience. So go ahead and write whatever you think they might be searching for (we’ll cover this in the next sub-section!).
But once you have a decent amount of readers, you can start doing these things:
- Ask for input: you can get an idea of what your readers are thinking by creating polls on social media, sending out newsletters, etc.
- Read comments: sometimes, your readers leave comments asking about a certain problem. If you think you could help them by writing a post about it, do it!
- Check your analytics: you can find out what your most popular posts are by going to Google Analytics > Behavior > Site Content > All Pages. As you can tell from my analytics, productivity and organization are 2 of my most popular categories.
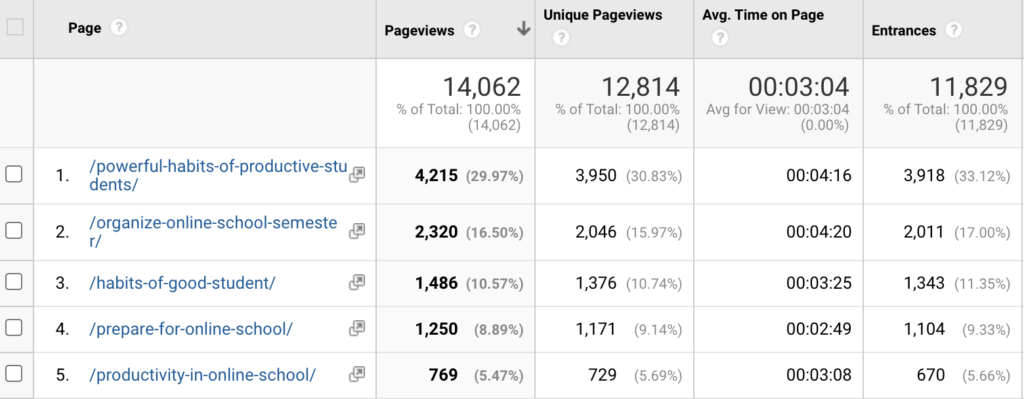
Keyword research
Now that you have a target audience in mind, you can start brainstorming content ideas that they might be interested in. In order to do that, you need to perform keyword research.
What is keyword research? To put it in simple terms:
Finding commonly-searched words/topics.
Here’s what you can do to find keywords:
1. Search for keywords on Ubersuggest
Ubersuggest is a free tool (there’s a paid version, but the free plan works just fine) where you can analyze keywords and websites. Once your blog is more established, you can search up your own URL to find out how much organic traffic it’s getting and your DA score, etc. However, that’s not necessary for now.
For now, simply hop over to Overview under the Ubersuggest section and type in a keyword you think people might be searching for. For this example, I searched up banana bread recipe.
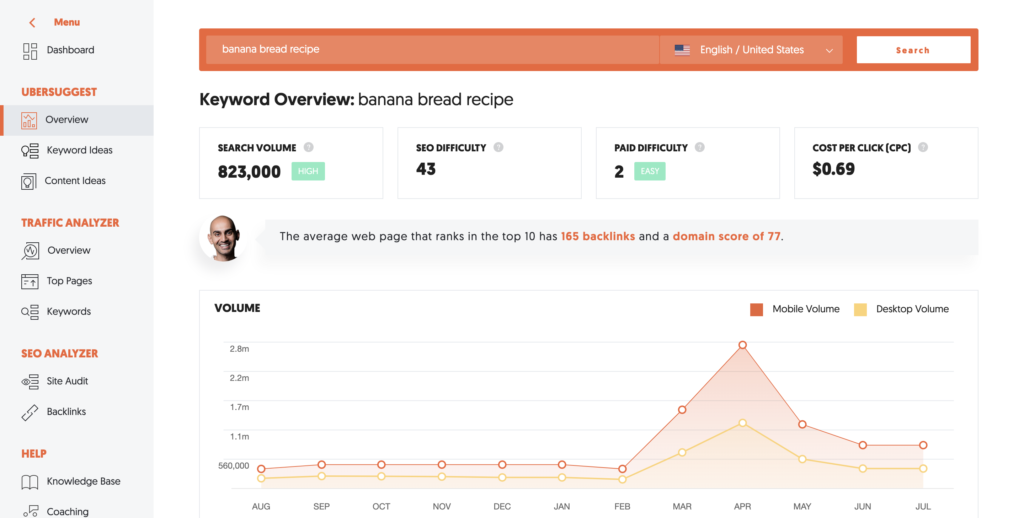
You can see that this keyword has a high amount of search volume, but also a high SEO difficulty (meaning you’ll have a hard time ranking on Google for this keyword).
Let’s try easy banana bread recipe instead.
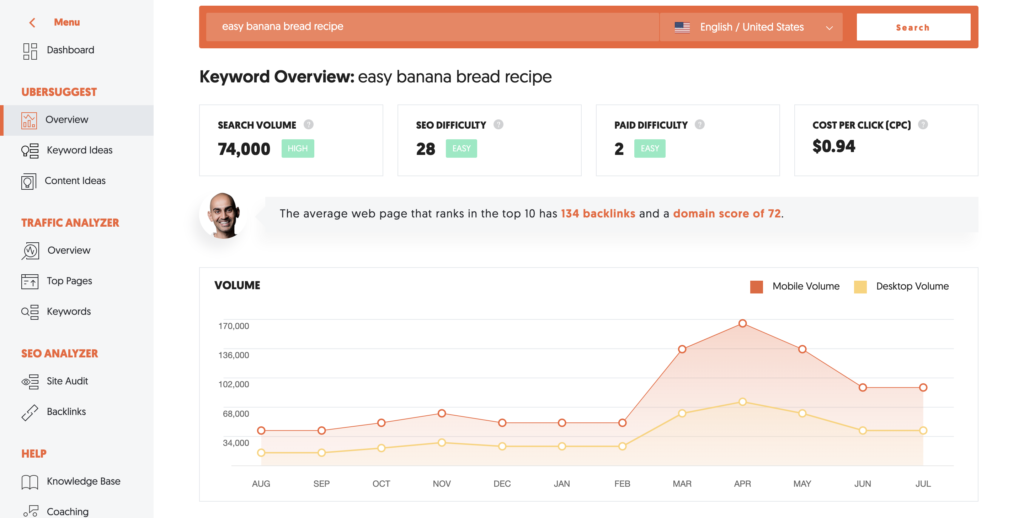
This time, the SEO difficulty is 28, which means it’s much easier for you to rank for this keyword. This is generally the case with long-tail keywords.
Long-tail keywords are simply keywords that are 4-6 words long. These keywords are often a lot more specific. Although they have a lower search volume than shorter keywords, their SEO difficulty is much lower, which is good news for beginner bloggers.
2. Stalk other blogs on Ubersuggest
This is another amazing feature in Ubersuggest: analyzing other domains!
Go to Overview again and this time, type in the URL of another blog in your niche. For example, if I was a food blogger, I might search up pinchofyum.com.
Once you scroll down a bit, you’ll see a list of the top keywords from this blog. This means that whenever someone searches up one of these keywords, a post from Pinch of Yum appears in the top search results, and that person clicks into the blog and reads the post.
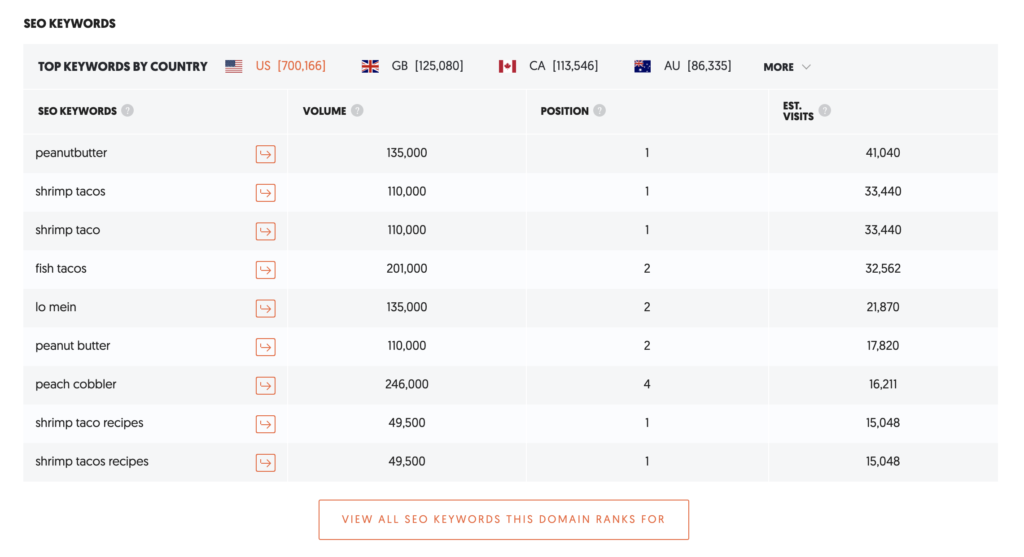
This is a great way to figure out what keywords are already bringing traffic to your competitors, and what keywords you should focus on to get traffic.
Another thing you can do is find out what specific posts from your competitor are getting the most traffic.
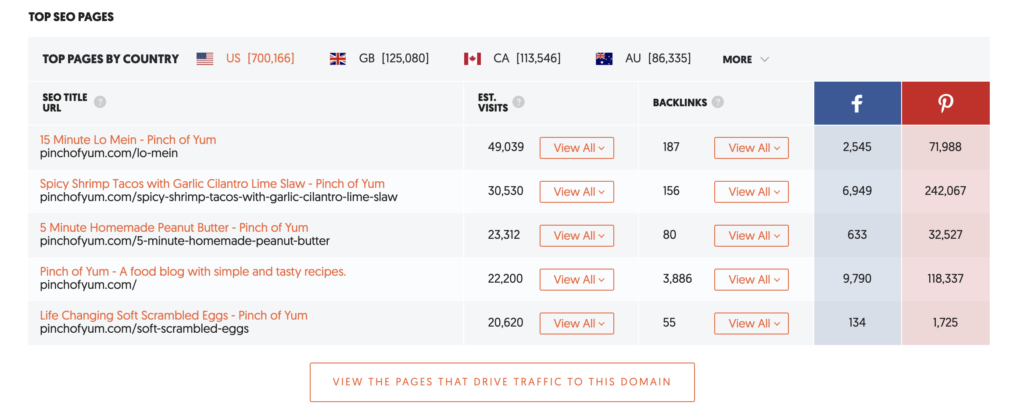
You can tell here that 15 Minute Lo Mein is the top post from Pinch of Yum. Thus, you can try to write something inspired by that (not the same as that, obviously), since you know that a post like this is popular among readers in your niche.
3. Search for keywords on Pinterest
While I believe the first 2 methods are perfectly enough to get started, you can go the extra mile by searching for keywords on Pinterest.
Researching keywords on Pinterest is actually super easy! All you have to do is type in your keyword/keyphrase and hit enter.
I searched up banana bread recipe (yup, again). But we don’t actually need to look at any of the pins that show up. All you have to look at are the suggested keywords right under the search bar.
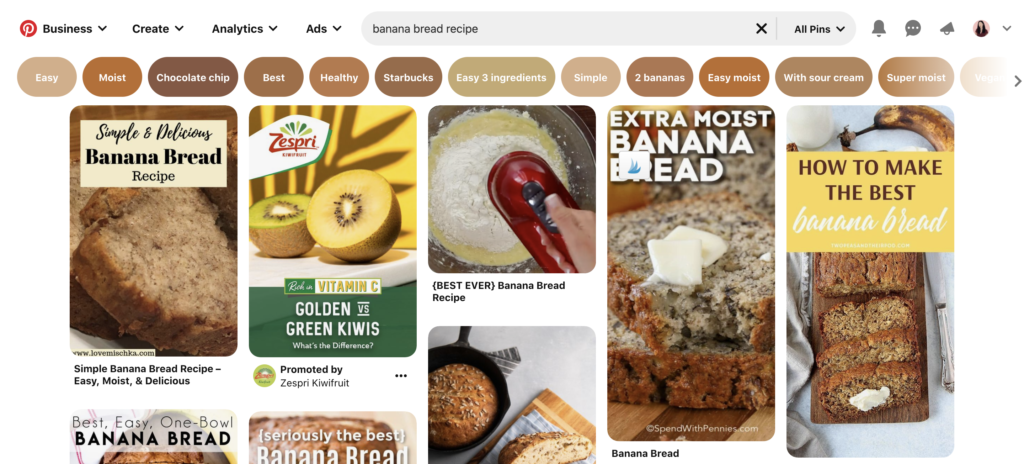
These are words that people usually search for along with the keyword you typed in. You can click on them to get even more specific and find long-tail keywords.
Titles
Your post title is super important. It’s the deciding factor in whether or not someone is going to read your post. Let’s take an example. You search up banana bread recipe and 2 recipes come up:
Yummy Banana Bread Recipe
4-Ingredient Banana Bread You Can Make In 10 Minutes (With Video!)
Which one are you more inclined to click on? The second one, of course!
Good titles invoke an emotional response, whether it’s curiosity, surprise, or anger. They should also include numbers (prime numbers seem to get the most clicks). And if your post content allows, your title should be in one of these forms:
- How To…. in # Easy Steps
- # Insane Ways To….
- # Powerful Hacks To….
You get the idea.
Luckily for you, WordPress has a plugin that can do all the analysis for you. If you have MonsterInsights installed (which you should by now!), you’ll have access to the Headline Analyzer.
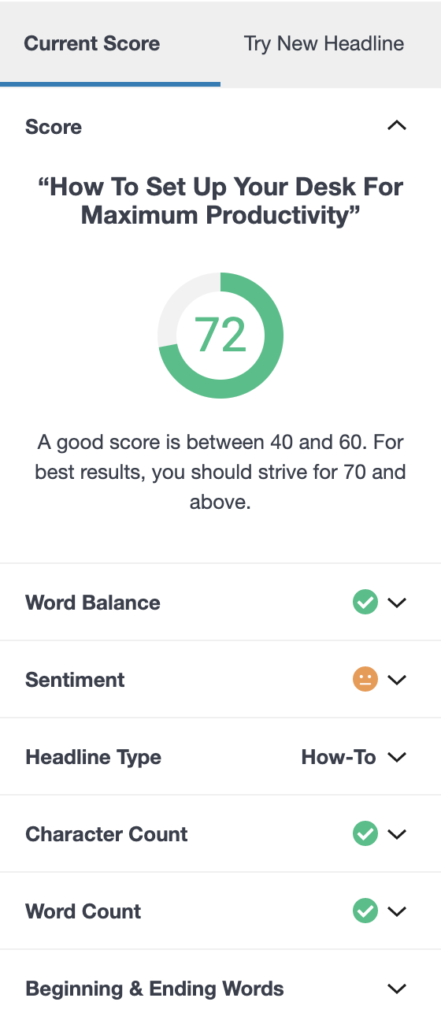
It scores your headline and gives you suggestions on what you can improve. While you don’t need to satisfy all its requirements, a small tweak here and there will definitely improve your clicks.
Actual writing
Here’s the fun part! Actually writing.
Where to write
While you can directly type up your draft, revised draft, and final post on WordPress, I don’t recommend it.
I suggest creating a Google Docs template that has your introduction, subtitles, and conclusion pre-formatted, filling in the blanks as you write, and then copy and pasting everything into WordPress after you’ve edited it.
Readability
You can see that I’ve split up the post with subtitles. These aren’t just for making your post easier to read; they are specifically formatted to be H2 headings, which are crucial for SEO.
Within each section of your post, you should also be splitting up content. No one wants to read big paragraphs unless they have to.
You should start a new paragraph every couple of lines. The shortest can be 1 line, and the longest should be between 4-5 lines.
You should also include bullet points and lists like this:
- My first point
- My second point
- My third point
People are more likely to focus on subtitles and short bullet points while skimming through a post, so it’s important that you include plenty for them to read!
After you’ve written your post and pasted it into WordPress, you can reference the Yoast SEO plugin to assess your readability. It will tell you if certain blocks of text are too long, and you’ll be able to go back and fix it.
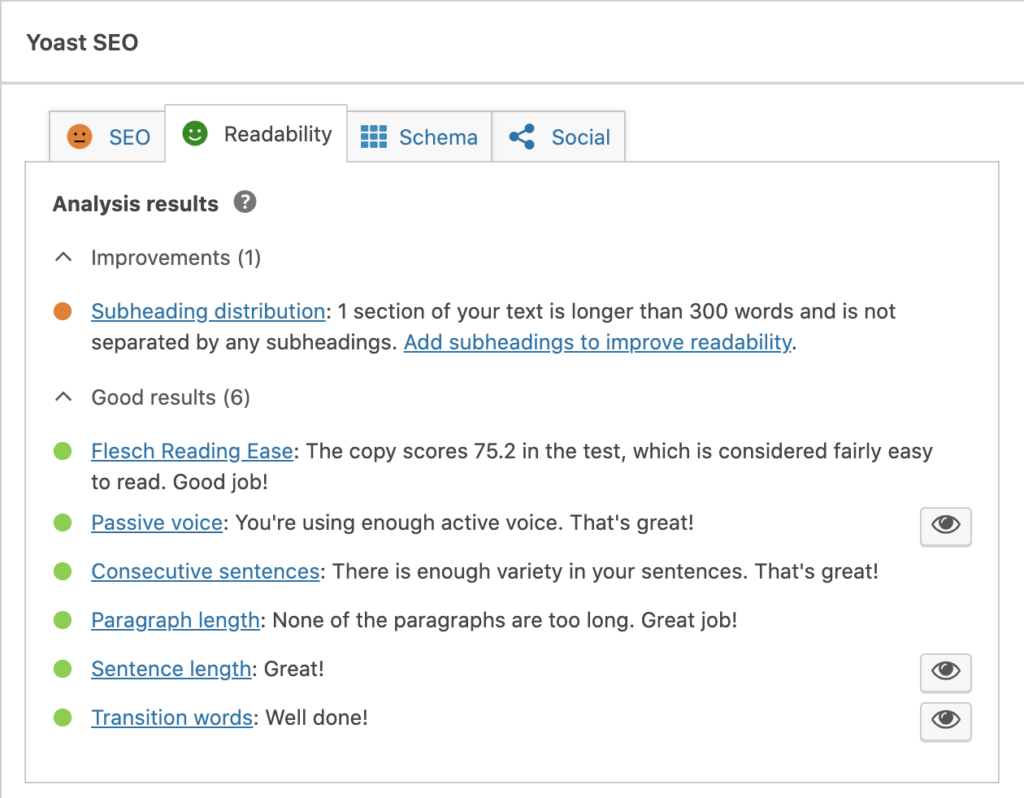
SEO
SEO is super important. You must be implementing it everywhere on your blog in order to maximize your probability of ranking. Here are the basic steps you must take every time you write a post:
1. Your post should revolve around the keyword that you researched earlier. You should mention the keyword/keyphrase in your post title and throughout the post. This will let search engines know that your blog post focuses on that keyword, which means that it will be more likely to rank you on a search page.
2. This might seem like a given, but you need to ensure that your blog is written with correct grammar and spelling. Even if your words just sound a little bit confusing, your readers will be more likely to bounce from your page (bad for your traffic and bad for your SEO).
The easiest way to ensure perfect grammar is by using Grammarly. This is even simpler if you decide to write on Google Docs, because it will automatically scan and point out errors on your entire document!
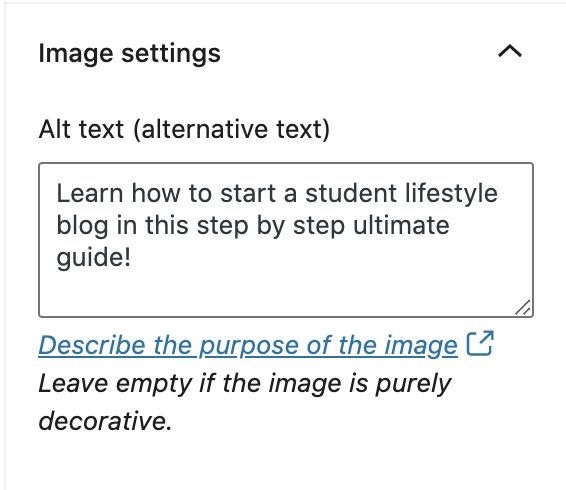
3. Another small thing you can do for SEO is adding alt texts to all of your images. When you insert an image, you’re given the option to add an alt description. In that, add some keywords! Here’s an example of what I wrote for some of the pictures on this post:
General tips
Here are a couple more tips you should keep in mind:
- Write in a casual voice– as if you were talking to a friend.
- Include call-to-actions throughout the post, but especially in the conclusion!
- Include a lot of images (you can get stock images for free on Pexels or Pixabay).
- Don’t forget to proofread before publishing!
And that’s all for writing your posts! Once you have 15-20 posts down and stored in WordPress, you’re ready to launch your blog.
Step 5: Launch Your Blog
Physically launching your blog is easy. All you have to do is remove the WordPress “Coming Soon” page (it should be an option at the top of your WordPress Dashboard).
But as soon as you launch your blog, you need to hop on some jobs. 2 of the most important are gaining subscribers and buyers through email marketing and building a presence on social media.
Email marketing
If you haven’t signed up for an email marketing service yet, this is the time to do so. Don’t make the mistake I did, which is waiting 2 weeks before starting an email list.
If you’re hesitant on doing this, I totally understand why.
I didn’t have any products to advertise or any promotions to make. Why should I bother making an email list?
Wrong.
Your blog is your product. You need to keep promoting it to your existing readers in order to make sure they keep coming back; you also need to create appealing opt-ins to draw in more subscribers.
Not only that, if you want to make money, you need to have an email list. Readers are important, but subscribers are even more important.
These are the people who signed up to get more information from you. They’re willing to spend time with you because they think you’ll be able to solve their problems. They might also be willing to spend money. You know what that means? A sales opportunity.
You don’t need to sell your own products to your email list (it’s difficult enough to create one in the first place). Once in a while, you can promote an affiliate product. Just make sure that you really believe that this product will help make your readers’ lives better.
But if you do have your own product, you should try to create a sales funnel to lead them down to your product.
Sales funnel
Creating a good sales funnel is very complicated and takes time and practice. But in this post, I’m going to show you the basics of it. Here’s the outline of what a sales funnel looks like:
- Stage 1: Problem awareness
- Stage 2: Solution awareness
- Stage 3: Product awareness
- Stage 4: Product interest
- Stage 5: Product action
We will get into detail about what you should do in each stage later in the post, in Step 8: Monetizing Your Blog.
How to collect emails
So now you know how important email lists are, and even a little bit about how to make sales through them. But let’s backtrack a little bit and talk about how to actually collect those emails in the first place.
The first thing you need is an email-marketing service provider. This will be the platform from which you create opt-in forms, send newsletters, track subscribers, and more.
One of the most popular and reliable providers is Convertkit. I personally love Convertkit for its powerful tracking dashboard, beautiful forms and landing pages, and intuitive newsletter & automation campaigns.
Check out this short video from Convertkit showing you everything you can do: ConvertKit | Email Marketing for Online Creators.
Oh, and Convertkit is totally FREE to use up to your first 1,000 subscribers. You get to track your subscribers, create unlimited forms and landing pages, send newsletters, and more, all for free. Just click here to go to Convertkit and click Launch your next project for free. Go ahead and follow the steps provided to set up your account and come back here once you’re ready!
Alright, you ready?
Now I’ll guide you through creating your first opt-in form.
When you open Convertkit, you should be in your Dashboard. Find FORMS at the top of the screen and click it.

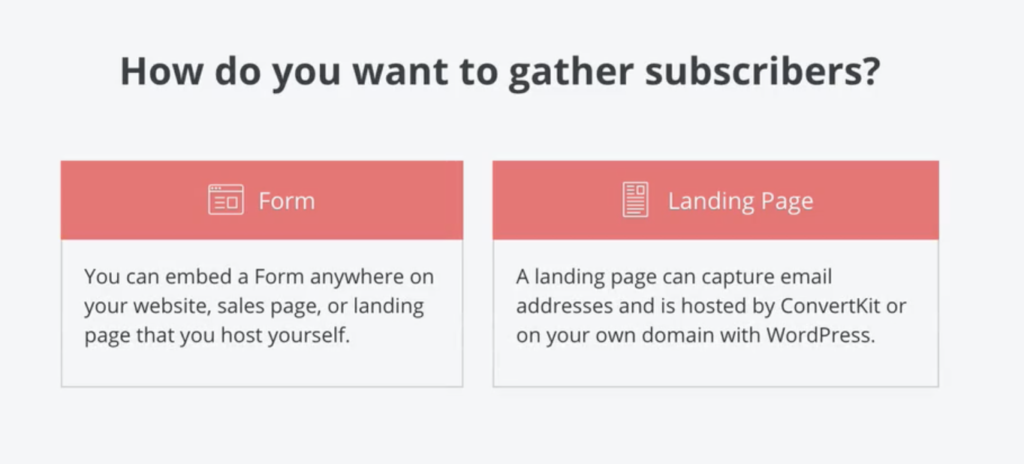
Next, click the coral button that says New Form. It will now ask you to choose the format of your opt-in. For this guide, we’ll make a Form (Landing Pages are generally for products or email courses).
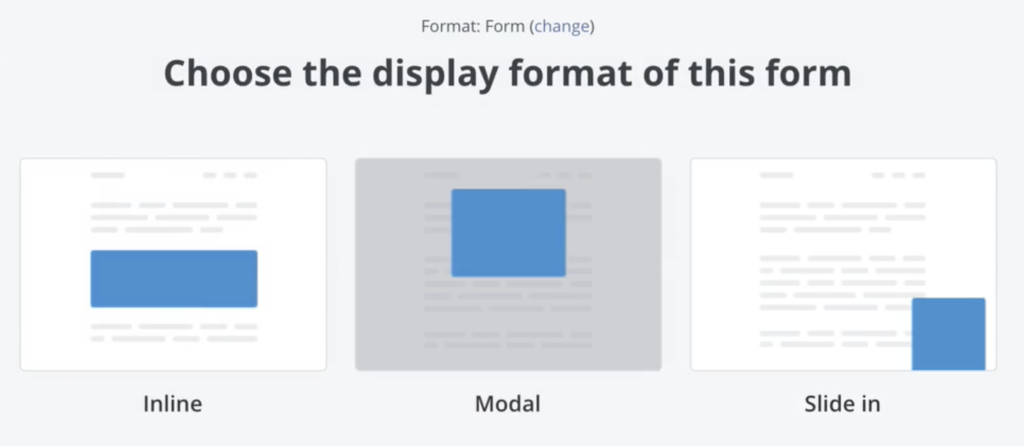
Next, you can choose the appearance of your form. You can make an Inline form, and Modal (popup) form, or a Slide in form. Right now, we’re going to make an Inline form.
Then, you’ll get some choices of templates. Choose one you like and select it. Now, you should see something like this:
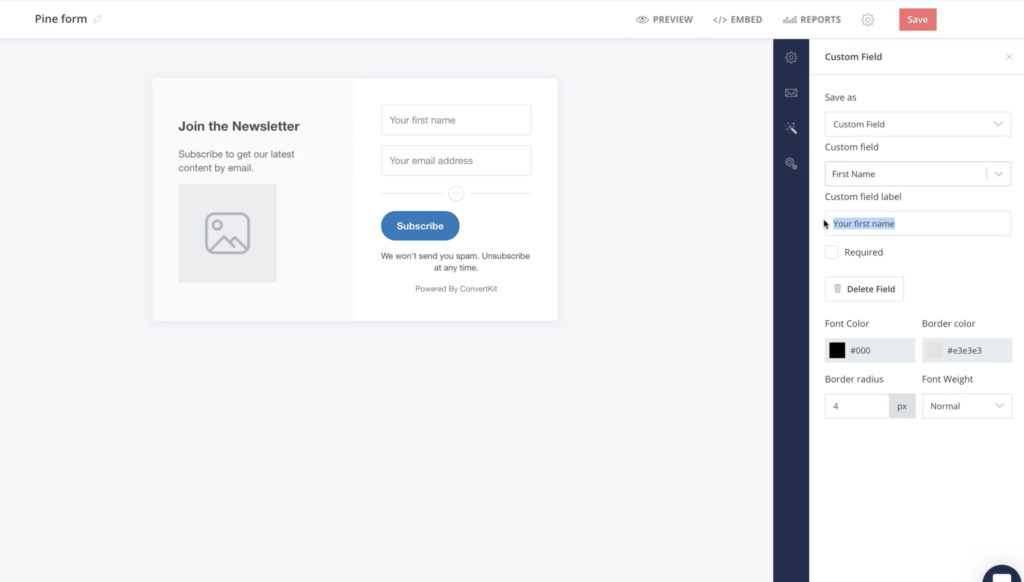
Here’s where it gets fun! You can customize almost every feature of your form, such as colors, sizes, fields, and pictures. Play around with it!
The last thing you need to do is save and embed the form into your blog. Convertkit makes this super easy with a plugin. Follow this guide from Convertkit to learn how!
Once you’ve started your email list, you’re set to move on to the next step.
Social media
When you first launch your blog, social media is going to be your main source of traffic. This is because Google hasn’t had enough time yet to crawl your website, determine its purpose, determine its value, and rank it in results.
Of course, Google SEO is still very important, even for a new blog. You need to build up a strong SEO foundation in order for Google to like your blog. The key task here is keyword research, which we discussed earlier. There are many more aspects of SEO, which we’ll touch on later.
Now, we’re going to talk social media.
Our main target is Pinterest. Yup, Pinterest– the same place we went to for photos of BTS or Harry Styles. No? Just me?
Pinterest is a goldmine for bloggers, and you need to be taking advantage of it. That’s why I have an entire section dedicated to Pinterest traffic! But before we get there, I’m going to go over a couple of other sources. You don’t have to be on all of these, but it’s helpful to at least have 1!
I personally don’t use Facebook for promoting my blog.
I tried, but I made a major mistake from the very beginning then just gave up (you’ll see what I did in a second).
Facebook is a popular place for bloggers to get help and promote their posts. Some big bloggers who blog about blogging created Facebook groups just for their readers and followers to ask questions and get help from each other. Some are private, others are public.
These are super helpful for new bloggers because many participants probably went through the exact same problems as you. So once you create your Facebook account, search for a blogger you look up to and see if they have a Facebook group! If they do, see if you can join!
Other profiles create promotion groups. They let you self-promote and encourage you to check out fellow bloggers. These could bring you some quick traffic, but they’re usually not good traffic.
Readers who come from promotion groups are simply clicking on your link so you’ll do the same for them. They’re not actually interested in your content, which means they’ll usually leave the page in less than 5 seconds. That brings up your bounce rate (how likely readers bounce off from your blog), which is not good for your blog. This is why I don’t really recommend joining promotion groups.
Although I don’t have any recommendations for specific groups to join or how to bring up engagement, I do have 1 big tip:
Don’t post the link to your blog under every single promotion post.
This is a newbie mistake and probably very intuitive, but I made that mistake and got banned. I was no longer allowed to post my website’s link anywhere on Facebook, and I couldn’t even get help.
Luckily, that was with my old blog, which has since been deleted anyways. But yeah, don’t do that!
Here’s the thing about Twitter: tweets die fast. In order to keep engagement up, you need to tweet at least once an hour. (I currently tweet about 5-6 times a day, which is obviously not enough, but I’m getting there!)
In order to keep up with all the tweeting, I suggest you use a scheduler like Buffer. It’s a free app on your phone that will let you connect your Twitter account and schedule tweets before you post them. This has helped me stay relatively consistent with my tweeting!
Like Facebook, Twitter has profiles and threads that are dedicated to promotion.
Of course, this has the same issue as Facebook promotion groups. Readers are not authentic, and your bounce rate increases. While you could self-promote once in a while, don’t put all your energy into doing so.
Instead, focus on building your presence on Twitter. Keep tweeting consistently and finding relevant bloggers to follow/interact with. Here are a couple of tips about tweeting:
- Share both personal, relatable tweets and links to your blog post
- Include emojis (people love emojis) and images if relevant
- Tag relevant promotion accounts who’d be willing to retweet your tweet
I started on Instagram really late. However, I have done some research on Instagram for bloggers. Here are a couple of my best tips:
- SEO optimize your profile. Yup, you’re hearing it again. But don’t worry, SEO on Instagram is super simple. Simply add a keyword (like your niche) into the name of your profile. This will ensure that you come up in the search results if someone searches for that keyword (because let’s face it, no one’s going to search up your actual name on Instagram).
- Have a theme. Aesthetics on Instagram are super important, and the easiest way to ensure a good-looking profile is to have a theme. You can achieve this by using the same VSCO filter or Lightroom preset on all your photos.
- Post on your story every day. Yup, every day. Stories are a little easier to maintain because you can simply post a little video of yourself doing something fun or relatable. You can also create polls and questionnaires, which are great for engagement!
- Write long captions. You should always aim to write mini blog posts as your captions. Your followers will love you if they always feel like they’ve learned something from your post or caption! Keep reading for an example from my own post.
- Post multiple slides. We all know how Instagram works, right? You can post multiple pictures at once in the form of a “carousel.” You should definitely use this because it keeps followers on your post for longer. Instagram would like for its users to stay on the platform for as long as possible, so if your post is the one that’s doing just that, Instagram will give you a little boost!
Step 6: Pinterest Traffic
Okay, it’s time for the fun stuff.
Pinterest is crucial to beginner bloggers. In my first month, about 97% of my traffic came from Pinterest.
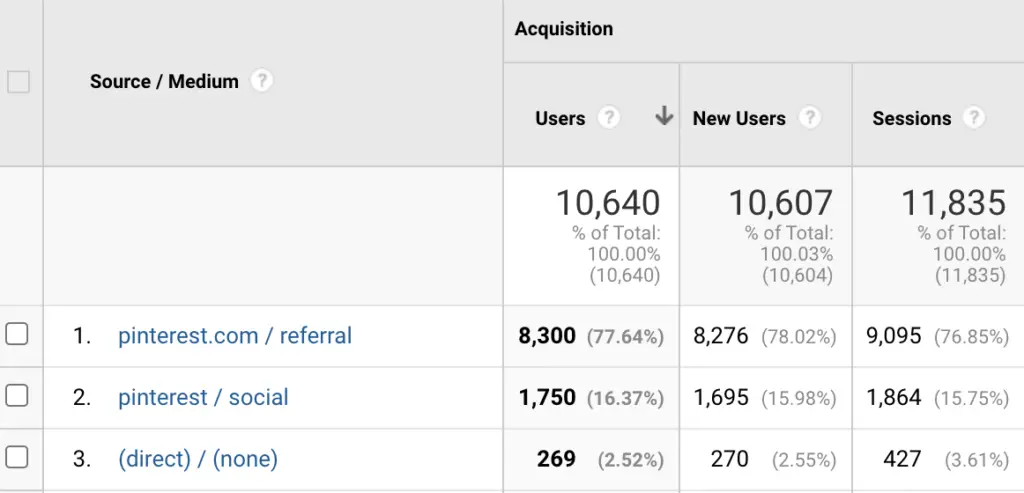
As a blogger, you’re going to have a love-hate relationship with Pinterest. Although Pinterest brings large amounts of quick traffic, the traffic is not steady at all. Even big bloggers sometimes have issues with Pinterest and its ever-changing algorithms.
However, as a beginner blogger, you’re almost forced to rely on Pinterest for traffic. Which is no biggie!
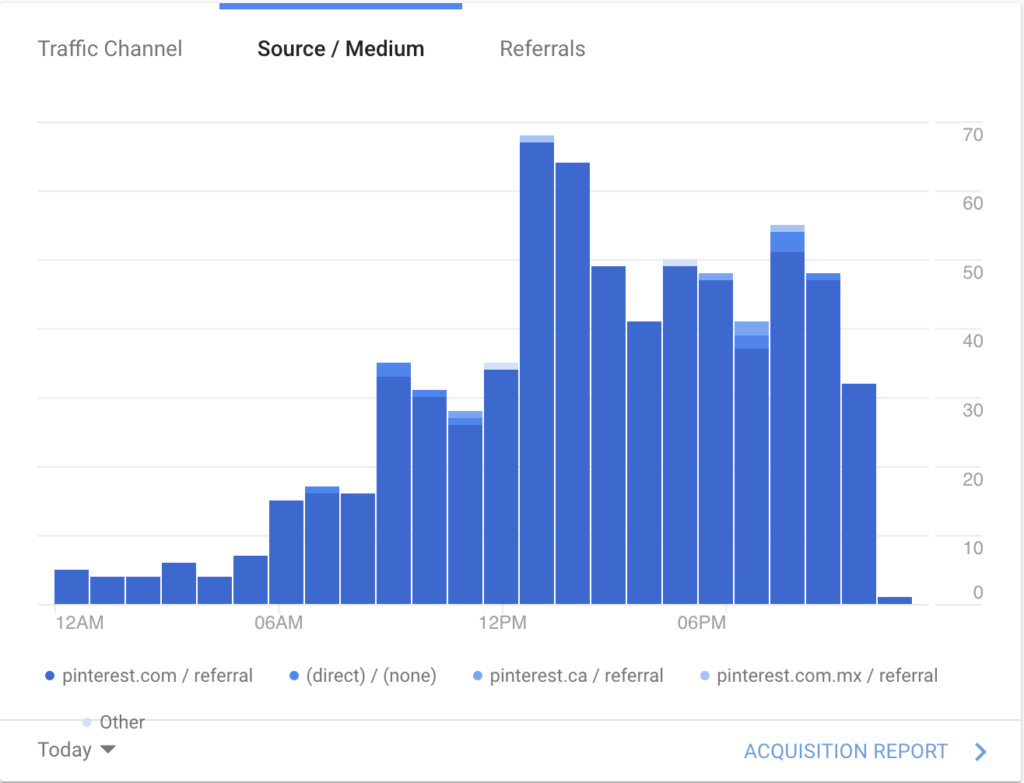
It’s not difficult to be successful on Pinterest. I’m going to show you the steps I took to reach 450k monthly viewers on Pinterest and 7000 sessions on my blog in 1 month. After this mini-lesson, you’ll be ready to have daily traffic like this:
1. Set up your profile
The first thing you need to do is to set up your Business profile. This will give you full access to advanced features like analytics and advertisements.
If you don’t yet have a Pinterest account, simply sign up and click Create a business account.
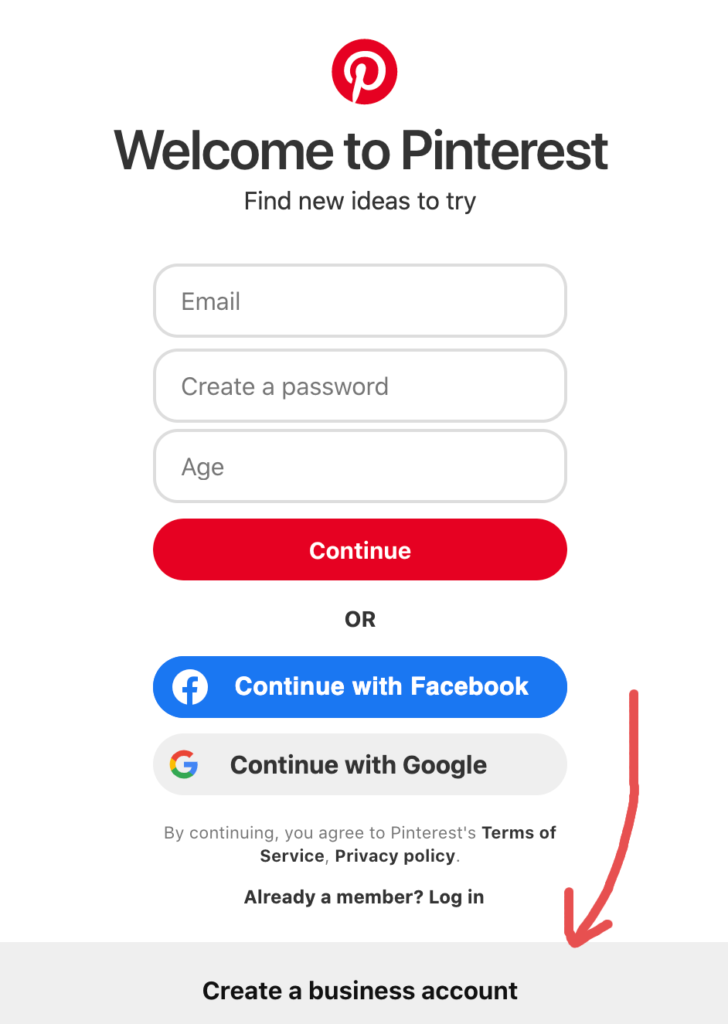
If you currently have a personal account, you can go to Edit profile > Account settings > Convert to business account.
Next, you must claim your website. This will make your profile look more professional, as well as incite more clicks to your website itself.
To claim your website, go to Edit Profile > Claim.
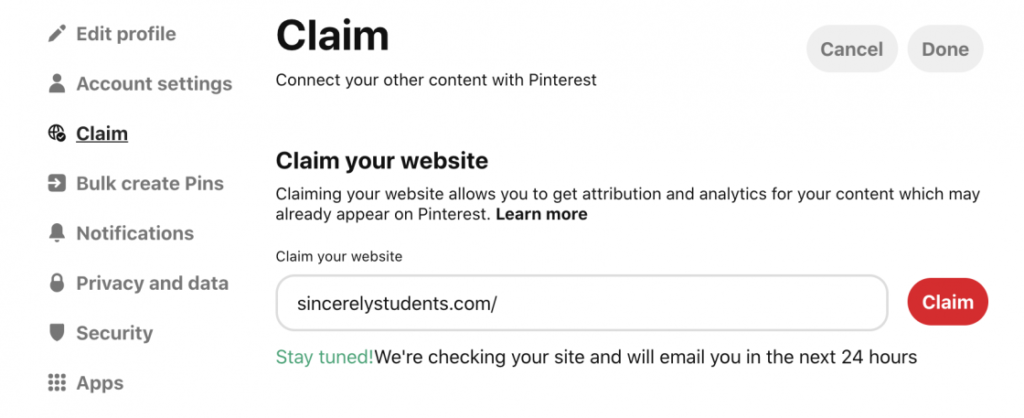
Once you’re there, simply type in your website and choose Claim. It will ask you to put code on your website. Choose the first option (adding HTML to your theme file) and copy the code. Paste that code above </head> in your blog’s theme HTML file. Once that’s done, click Next and wait! Pinterest will email you once the process is approved!
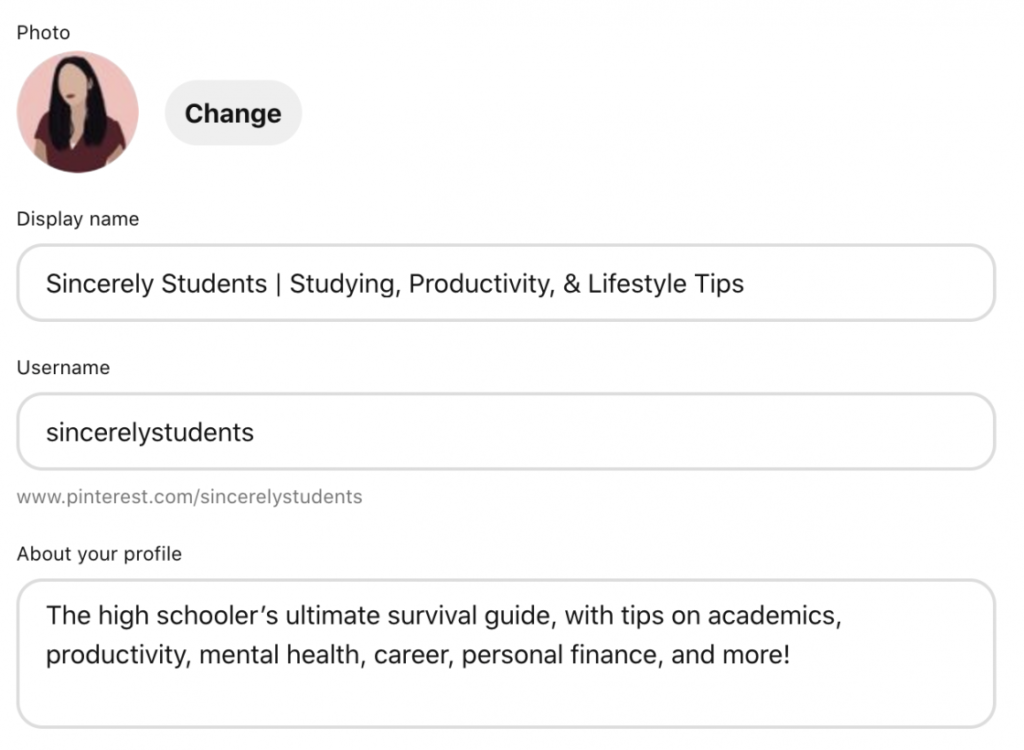
Lastly, you must SEO optimize your profile. Doing this on Pinterest is similar to doing that on Instagram. All you have to do is to include keywords in your name and description, like this:
2. Set up rich pins
Rich pins look like this:
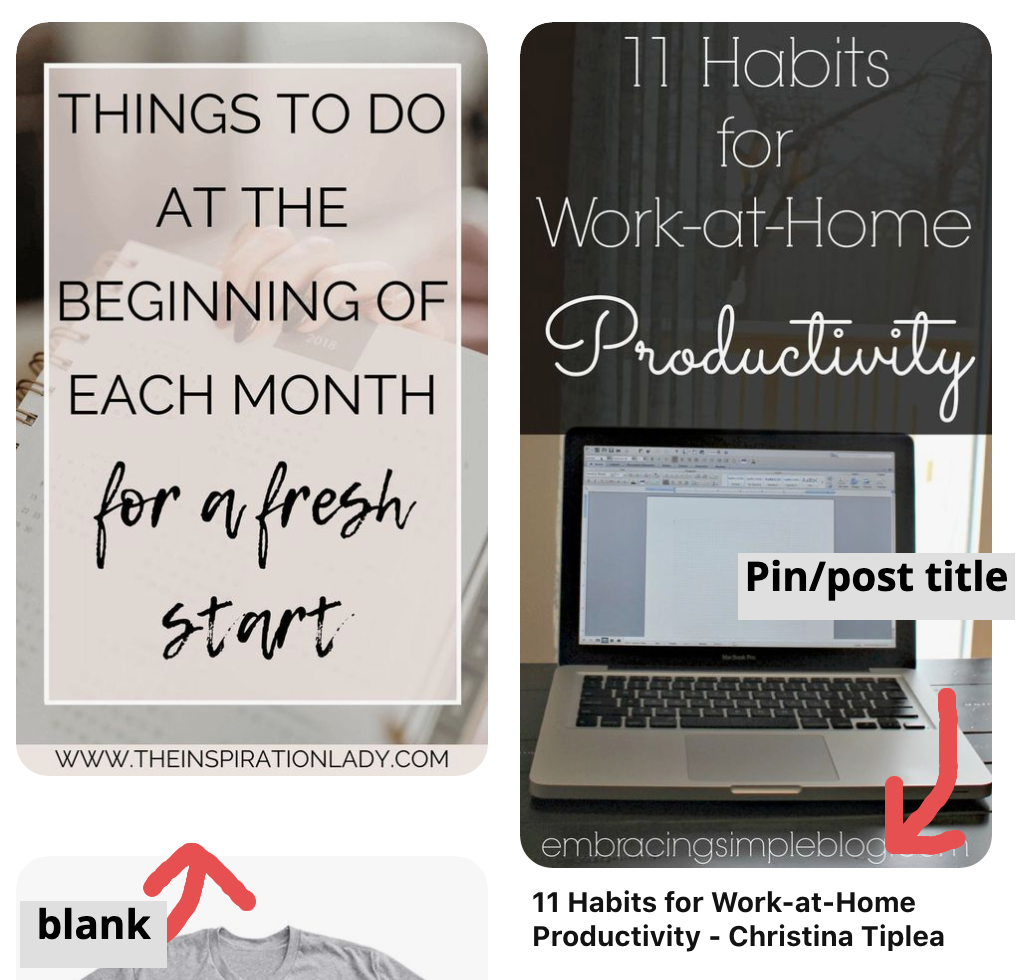
The pin on the left is a normal pin. The pin on the right is a rich pin, and it shows the post/pin title right underneath the image. Rich pins have more straightforward call-to-action options than normal pins, which means possible more traffic to your source.
Before you apply, you should have some content on your website. Of course, if you followed this post’s directions, you should be ready!
All you have to do to enable rich pins is go to Yoast SEO > Social > Facebook > Add Open Graph meta data > Enabled.
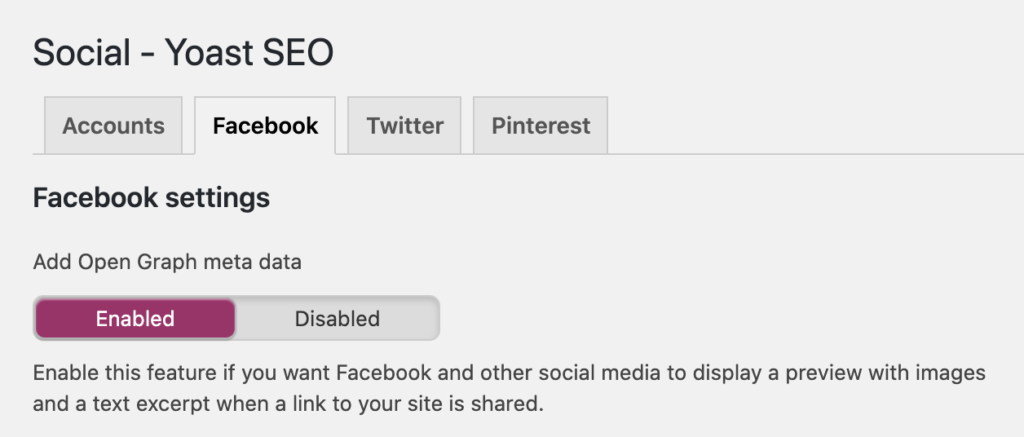
Then, simply go to the Rich Pins Validator and paste in a link from your blog. Once it’s validated, your rich pins are ready to go!
3. Create boards
Boards are one of the first things visitors of your profile see, so it’s important to make several relevant ones. I suggest anywhere from 15-25, so your profile looks professional and robust. However, relevance is super important here! If your blog talks about personal finance, don’t make a board for children’s fashion. Instead, make boards like:
- Side Hustles
- Saving Money
- Making Money
- Budgeting 101
- Investing Tips
Feel free to make as many relevant boards as you need. Remember to SEO optimize them! This means including keywords in the name and description. Board covers are optional and don’t do anything for SEO (Pinterest clarified this). However, they look pretty nice!
4. Create viral pins
Pinterest is a visual discovery platform. It’s not a social media, and it’s not 100% a search engine, either. In order to stand out on the platform and get more clicks to your blog, you need to focus on the visual design aspect of your pins.
Here are the elements of a well-designed pin:
- High-quality image (resolution)
- Size of 1000 x 1500 px
- Easy-to-read text overlays
- Sans-serif fonts
- Not too much calligraphy
- Preferably warm-toned
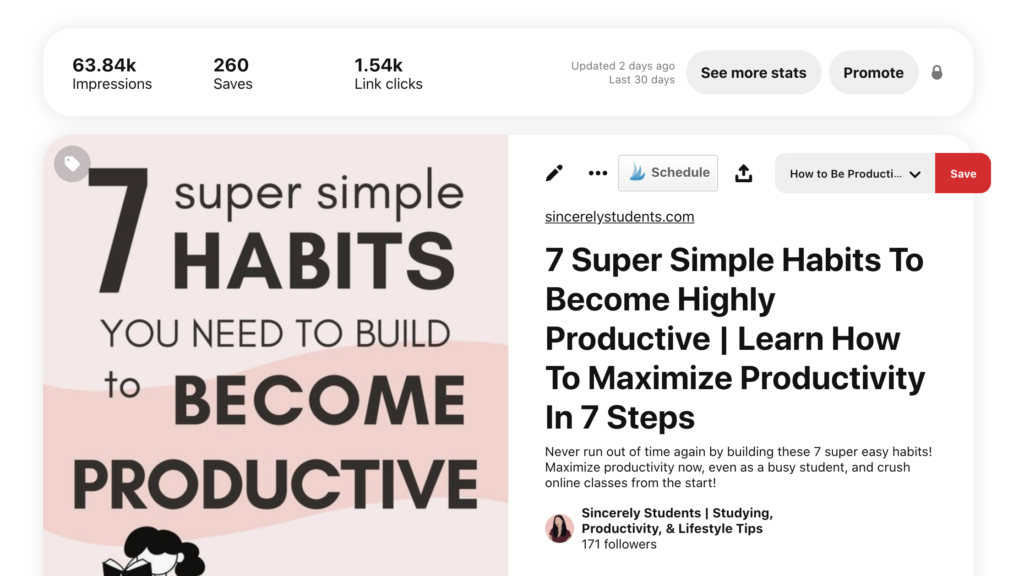
This image is actually my top-performing pin:
There is a consistent color scheme, clear text overlays, and an overall eye-drawing design. This is the type of design you want to aim for; of course, you should put your own twist on it!
The actual making of pins is super simple. I (and probably 98% of all other bloggers) use Canva to design pins. It’s a free tool that’s greatly intuitive and easy to use, not to mention its wonderful designs and templates!
5. Have a pinning strategy
Here is the most important part of Pinterest: a pinning strategy. You should plan out the following things:
- How many pins to publish a day
- How many pins to repin a day
- What time to publish pins
Pinterest loves new accounts, so you’ll have a little boost when you first start out, which you should take advantage of by pleasing Pinterest’s algorithm.
To do this, start by publishing around 6-10 of your own pins every day. This will be easier to achieve once you have more blog posts. Meanwhile, create different pin images for each post and publish them (here’s where reusable pin templates come in handy!).
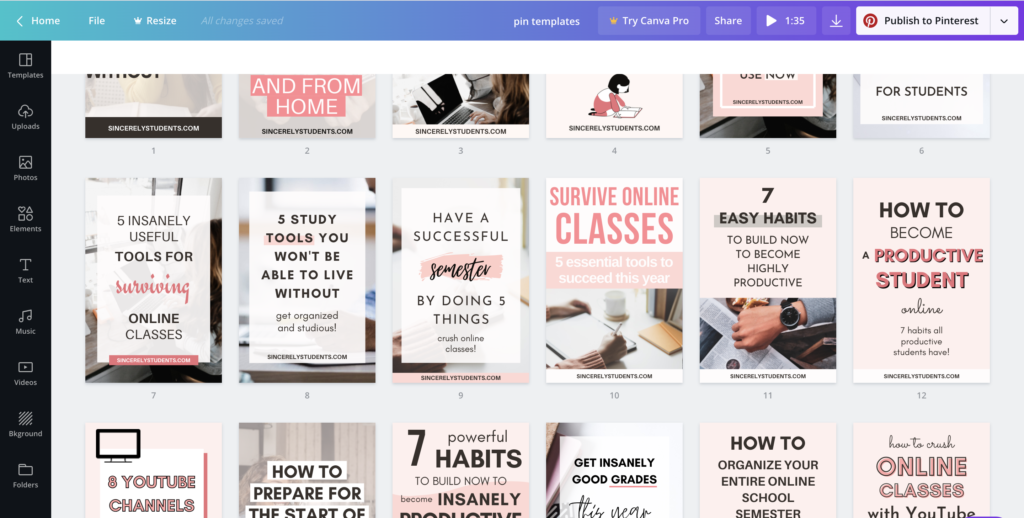
To make the process easier for you, I’ve created a pack of Canva templates that you can buy and start using immediately. Check it out!
Pinterest prioritizes fresh pins over everything else, so you should also focus on publishing new pins instead of repinning others’ content. However, if you run out of your own pins, it’s perfectly okay to repin.
It takes a lot of trial-and-error to figure out when you should pin, but here are a couple general tips about pinning:
- Don’t repin a pin to another board within 2 days of publishing it
- Don’t post more than 5 pins within 10-15 minutes
- Pin each pin to the most relevant board first
- Switch up your titles and pin descriptions
If you follow these rules, you’ll be able to get the most out of Pinterest without getting marked as spam (another newbie mistake I made).
And that’s it for the actual pinning! Now the last part of our strategy is group boards. Some say they’re out, others say they’re great. I’m going to give you my honest opinion about them.
6. All about group boards
Group boards are not out. But they’re not necessarily in, either.
They’re not as strong or as useful as a couple of years ago, but they still play a part in growing your Pinterest.
Before we get into the technical part of group boards, let me explain what they are.
Group boards are essentially the same thing as your own personal boards, but with multiple collaborators. You can find group boards by searching up a keyword, selecting Boards, and finding the boards that look like this:
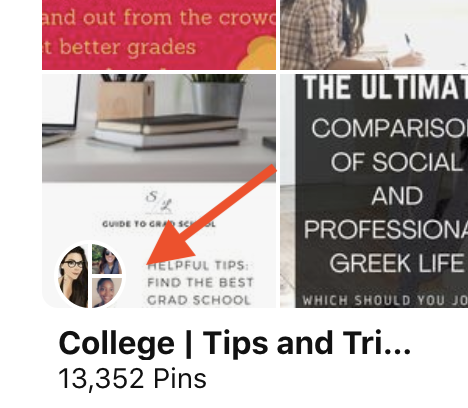
Group board owners usually have rules about how often you can pin to them and about how many pins you must repin from the board.
These rules help ensure that your pins are being exposed to more people. However, Pinterest doesn’t favor group boards very much (if at all). This means that your reach from pinning on group boards is going to be around the same as pinning on personal boards.
In fact, joining too many group boards and pinning all your pins to those instead of your own boards will harm your Pinterest reach.
Pinterest wants to see you prioritizing your own content, your own boards, and your own audience. So here’s my best advice:
- Join only 3-5 group boards, but don’t prioritize them over your own boards.
- When repinning your own content, leave group boards for last.
And that’s it for my Pinterest mini-lesson!
Step 7: Google SEO
Yeah, Pinterest traffic is cool. You can get a couple thousand views each day… but only if you’re very active on the platform.
Meanwhile, organic traffic is different. Once you rank on a search engine (and especially if you rank as a top result), traffic is going to keep rolling in. Even if you don’t do any promoting, you’re going to get great traffic.
This is because a lot of people are consistently searching for answers on Google, and they are clicking on the results to try and solve their problem. I mean, how many times have you heard the phrase, “Google it”?
However, Google rankings are hard to achieve. It’s different from Pinterest, where you’ll get boosted if you post often. Google is picky, and there are certain things you have to do to please it.
Here are a few of the most basic yet most essential things you have to do in order to optimize SEO and improve your chances of ranking.
Website format
As I touched on in Step 2: Blog Foundation, having a good-looking and well-coded website theme is the easiest thing you can do to improve SEO. This is because bots are going to crawl your website to determine its value. If your human readers can’t even navigate around your website, imagine what troubles a bot would run into!
Again, you need to find a reliable theme. If you haven’t already, check out the Genesis Framework from StudioPress.
Google Search Console
Google Search Console is a free service from Google that lets website-owners track their website’s search performance, such as rankings, crawl errors, and security issues.
In order to ensure that your website works well and continues to do so, you should add your website to it as soon as possible.
Here’s all you have to do:
Go to this link and click Start now.
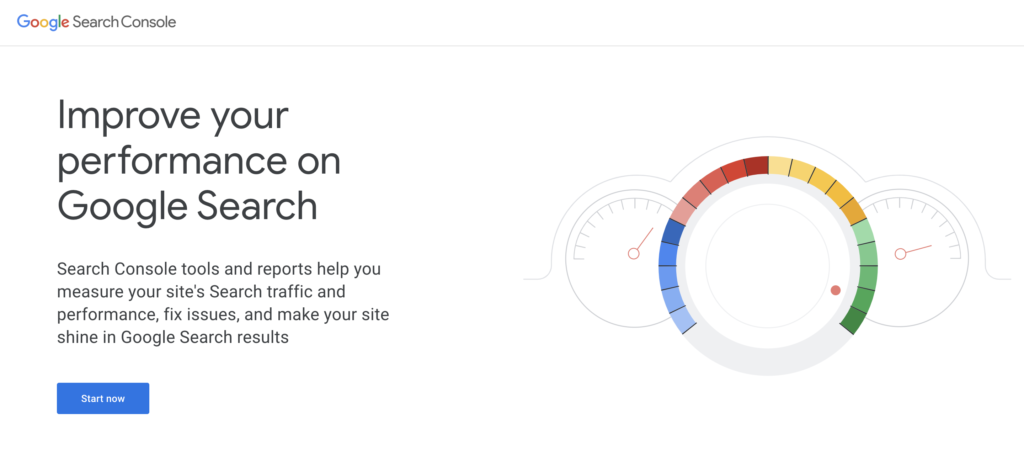
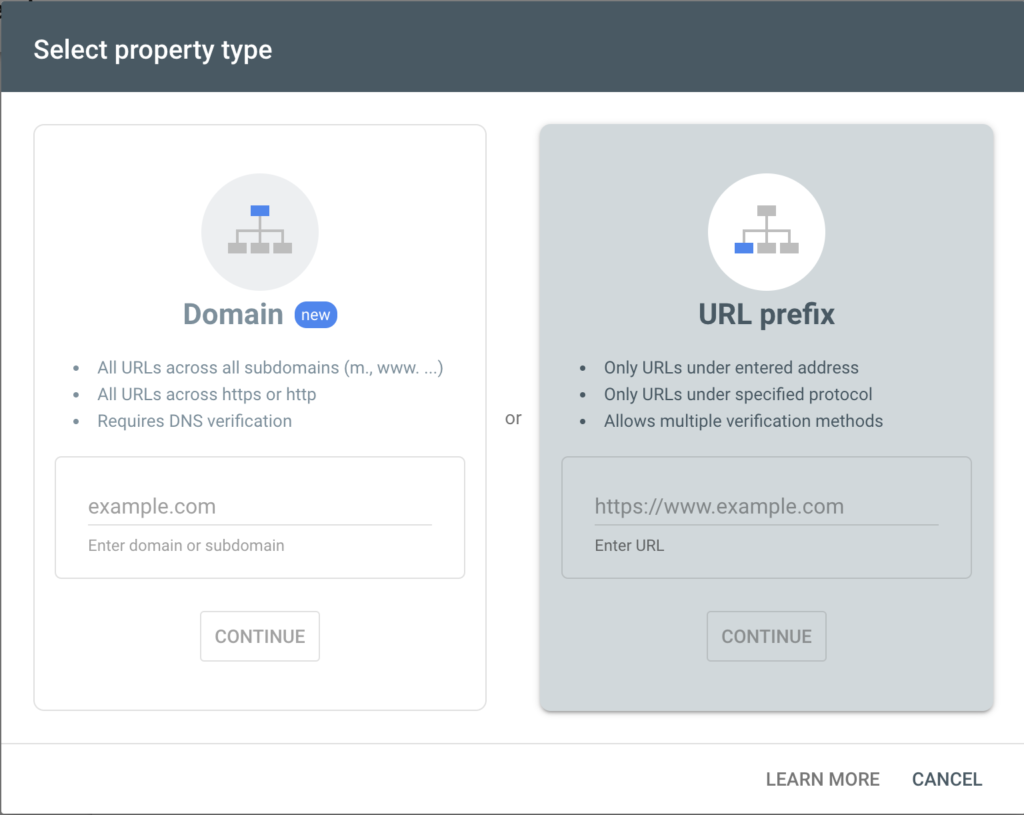
Sign in with your Google account. Next, you’ll select how to add your property. Choose the option on the right because it’s simpler and will not require DNS changes.
Now you’ll need to verify your website ownership. Scroll down a little to find the option that says HTML tag.
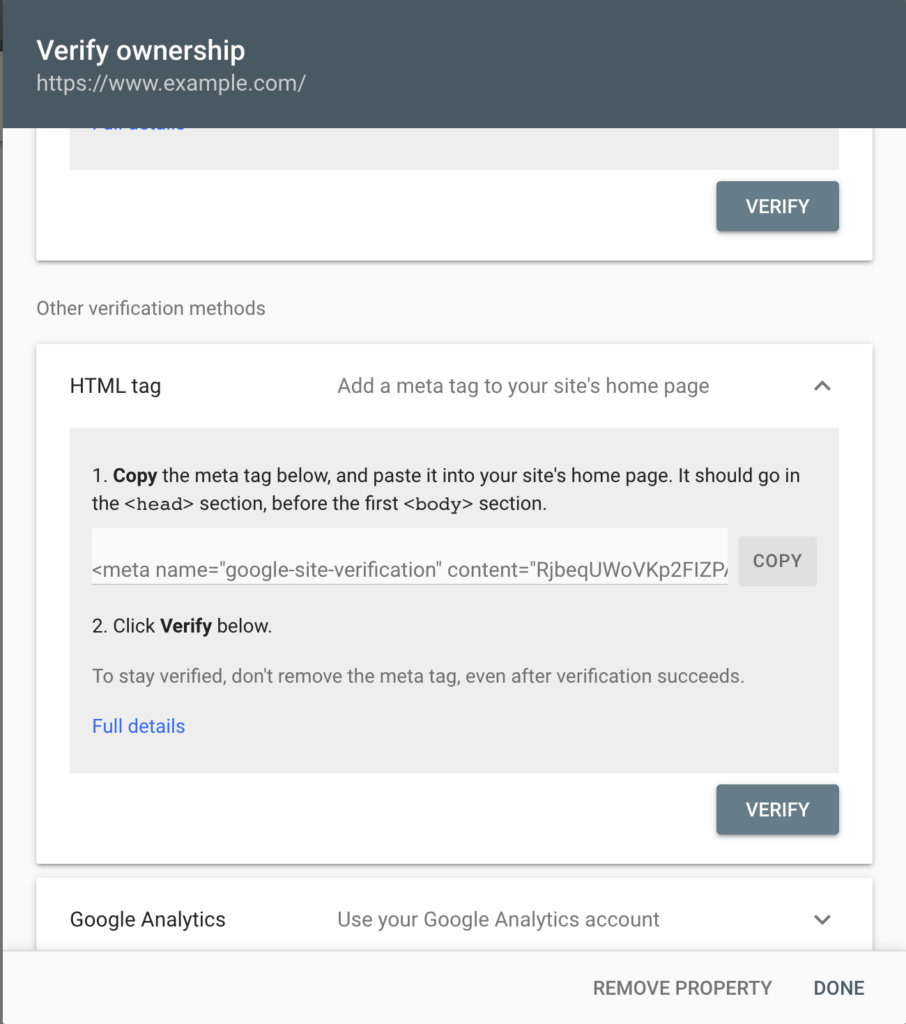
Simply follow Search Console’s directions to finish verifying your website. If you’re using a Genesis theme, all you have to do to insert the code is go to Appearance > Customize > Theme Settings > Header/Footer Scripts and add the code in the first box.
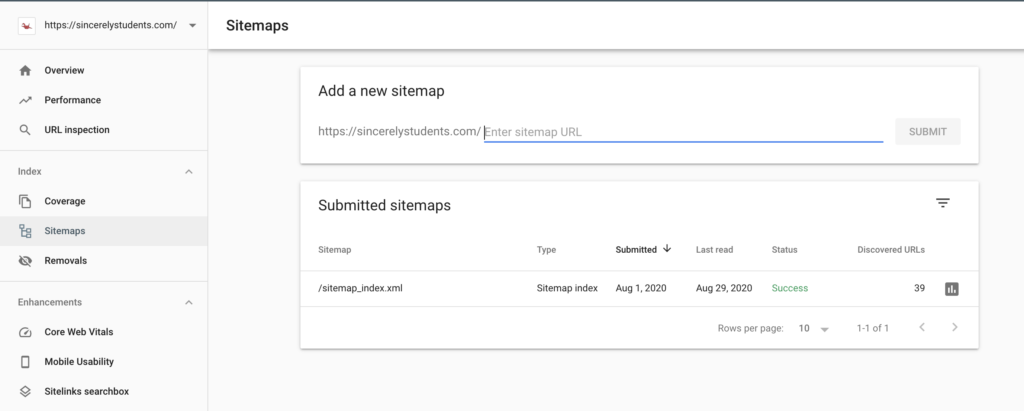
Now that you’ve verified your website, Google can start crawling your website. To help speed up the process, you can submit an XML sitemap.
To do this, go to Yoast SEO > General > Features > XML sitemaps > On. Then, click the little question mark to bring up more information.

Click See the XML sitemap to open your website’s sitemap. Copy the link from your browser and go back to Search Console. Go to Index > Sitemaps and add the copied link. Click Submit and you’re done!
Keyword research
I’ve already covered the basics of keyword research in Step 4: Quality Content. But if you need a refresher, here’s what you do:
- Search for keywords on Ubersuggest.
- Stalk other blogs on Ubersuggest.
- Look for keywords on Pinterest.
Now, there are a few more hacks for Google SEO specifically. And these are super easy to do! Simply go to Google and type in your keyphrase.
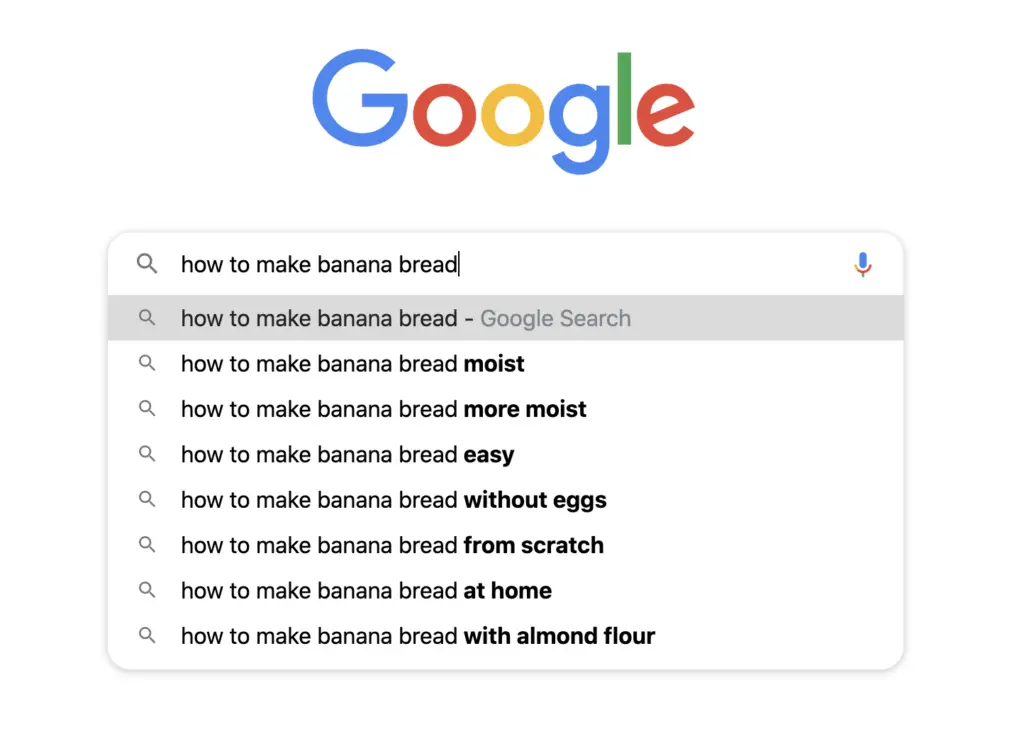
As you can see, there are a lot of search predictions that come up. These are keywords that people are searching for! So if your post is relevant, go ahead and add in these keywords.
Another way to find keywords is to search up your keyphrase then scroll to the bottom.
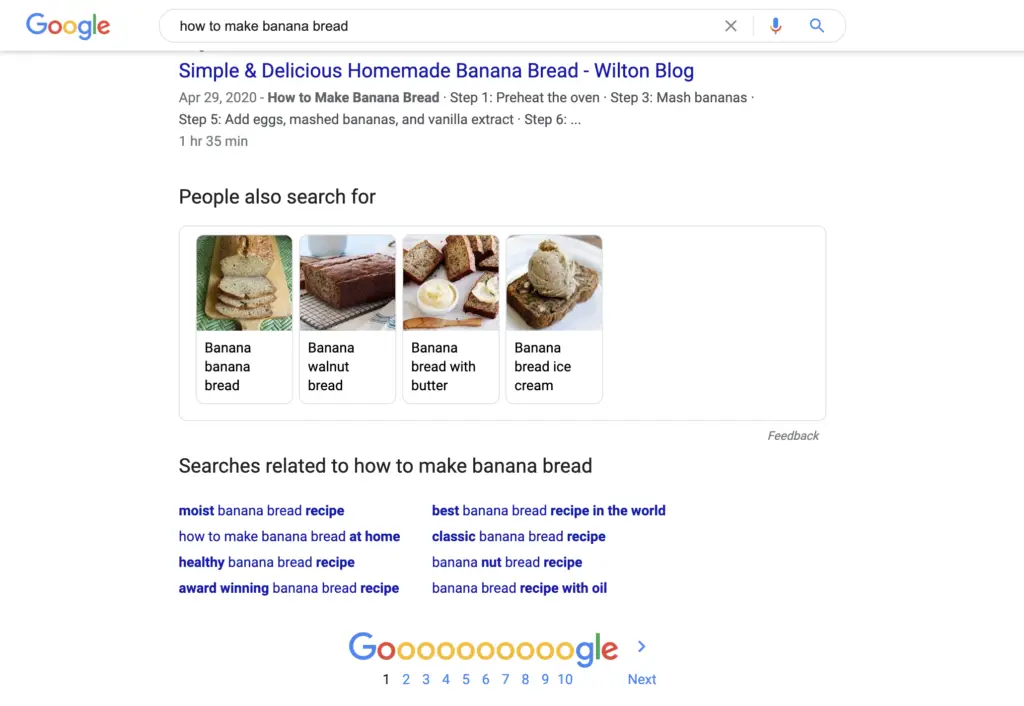
Here, you’ll find some related searches, which are also keywords you can use in your posts.
Backlinks
The last thing you should know about as a beginner is building backlinks.
To have a backlink is to have a link to your website on someone else’s website. The more backlinks you have, the more authority you’ll have on Google.
But building backlinks is hard. Not many people are willing to link to someone else’s blog in their own blog posts. But some would be willing if they also got some advantages by linking to your blog.
Here are the 2 easiest ways to build backlinks:
Create infographics
Even if you’re terrible at designing, you can create infographics (Canva’s your friend!).
If you’re writing a post that has multiple points to it (such as a list post or a step-by-step guide), you can create an infographic for it!
You can use Canva’s premade templates, or create your own.
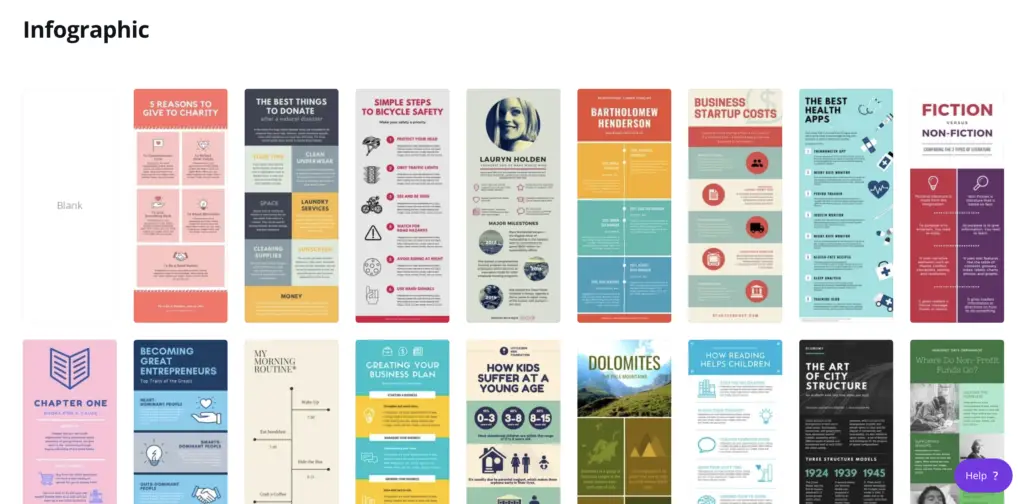
Simply attach your infographic to your blog post and promote it as you would.
If you want to go the extra mile, you can contact other bloggers who have posts similar to yours and ask them to link to it! Not all of them will say yes, but don’t take it personally!
Guest post
One of the most popular ways to build backlinks is to guest post. This is just as it sounds: you write a post for another blogger. The post will appear on their blog, in exchange for a link back to your blog.
This is a great way to build backlinks as well as get some referral traffic to your blog, but it’s more time and energy-consuming. If you love writing, this is a great choice for you. If not, try creating infographics instead.
Step 8: Monetizing Your Blog
You’re almost a real blogger! The last step is to monetize your blog, which means to build sources of income from your blog.
Contrary to what some people believe, bloggers don’t earn money by publishing content. I wish!
The content is there to attract an audience, which is the key to monetization. Your audience is your real source o income. Whether you’re using ads, affiliate marketing, sponsors, or else, you can only make money if you have an established audience.
This is why we spent so long preparing your launch, writing good content, and promoting your posts. These steps make up the foundation of a money-making blog. So if you’ve got all of them down, you’re ready to start making money (finally, right?).
Most bloggers monetize in 4 ways: display advertising, affiliate marketing, writing sponsored posts, and selling their own content.
Display advertising
Ads are probably the easiest way to earn money from your blog. All you have to do is to sign up for an ad-providing service and start placing ads on your website. 2 of the most popular and reliable ad services are Google Adsense (very beginner-friendly) and Mediavine (requires a lot of traffic before applying). I’m going to introduce you to Google Adsense.
Google Adsense
Google Adsense is a great place to start for new bloggers. They have no minimum traffic requirement, are adaptive to your content, and only require 1 piece of code to work.
However, the pay is relatively low, and you have to reach a threshold of $100 before you get any payments.
Therefore, I suggest that you start with Google Adsense and then move to Mediavine as soon as you reach the minimum traffic requirement (50,000 monthly sessions).
All you have to do to get started is go to this link and apply for Adsense. But before you do so, make sure your blog abides with Google’s rules. You must:
- Have a decent amount of content (at least 15-20 posts).
- Have a detailed Privacy Policy.
- Not have abusive/inappropriate content.
Once you apply, it will take anywhere from 2 days to 2 weeks for your application to be approved. Meanwhile, just focus on creating more content and promoting it!
Once you are approved, you can start placing ads on your website. The easiest way to do this is by using Auto Ads.
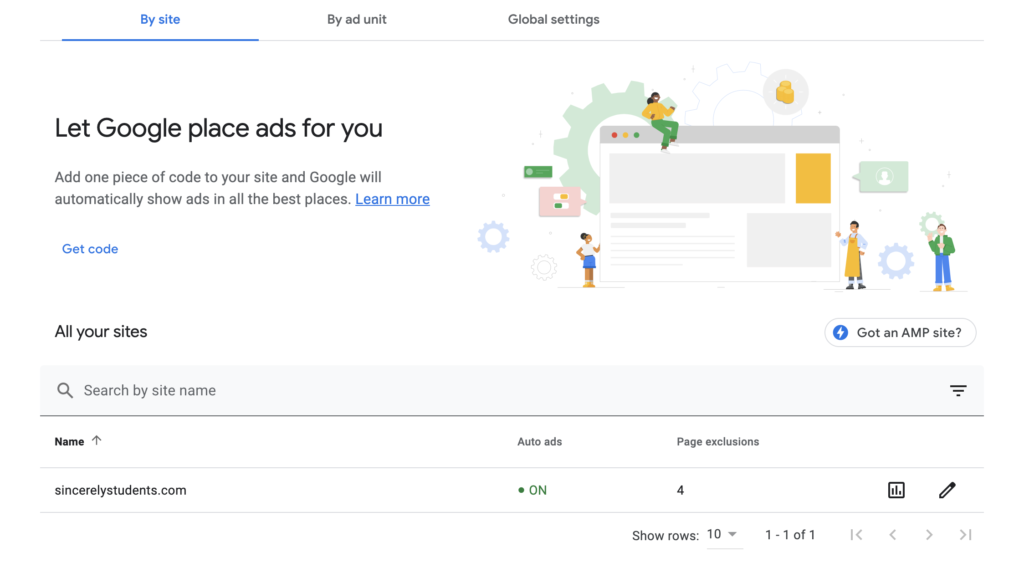
Simply click Get code and paste the given code on your website. It goes in the same place as the Google Search Console verification code (see Step 7: Google SEO if you need a reminder).
Once you add the code, you’re ready to go!
Affiliate marketing
Next up is affiliate marketing. Affiliate marketing is a great income source for any level of bloggers. You don’t need a large audience to make money via affiliates, though it definitely helps.
Here’s a basic definition of affiliate marketing:
Promoting others’ products and getting part of the commission the reader pays.
How do I become an affiliate?
You start by signing up for an affiliate program or network.
An affiliate program is from 1 company, offering either 1 product or a range of their products.
An affiliate network consists of multiple affiliate programs from various companies. You have to apply for each program, but it’s super convenient as a whole.
Here are some programs and networks I’m a part of:
- Amazon Associates: Definitely join this! The commission rates are less than 10% but there is a huge variety of products you can promote.
- ShareASale: This network hosts a lot of big companies like Grammarly, Tailwind, Masterclass, and more. The commission rates vary, but you can generally expect good amounts of clicks.
- Bluehost: If you use Bluehost as your web host, you can sign up for their affiliate program. Commission rates are pretty high, so if you blog about blogging, definitely sign up for Bluehost.
There are a couple more individual companies I am an affiliate of, and I became one because I used their product and loved them. If you try a product and believe your audience will love it, see if that company has an affiliate program you can apply to!
How do I promote an affiliate product?
All affiliate products come with a custom link. These links have a tracking ID embedded in it so the company can identify you as the customer lead.
All you have to do is to paste that link into your blog post. For example, in my How To Organize Your Entire Semester post, I promote a planner from Amazon.
First, I find the link for it. This is super easy because Amazon automatically provides you with links at the top of the page:
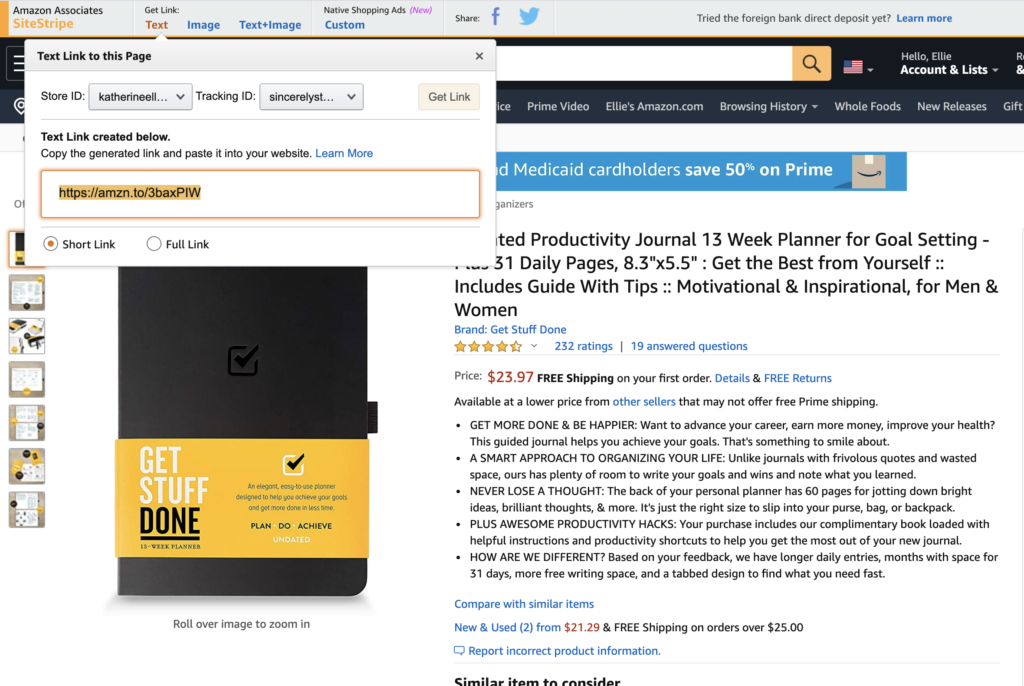
I simply copy that link and paste it into my post like I did here (all the pink texts are links):
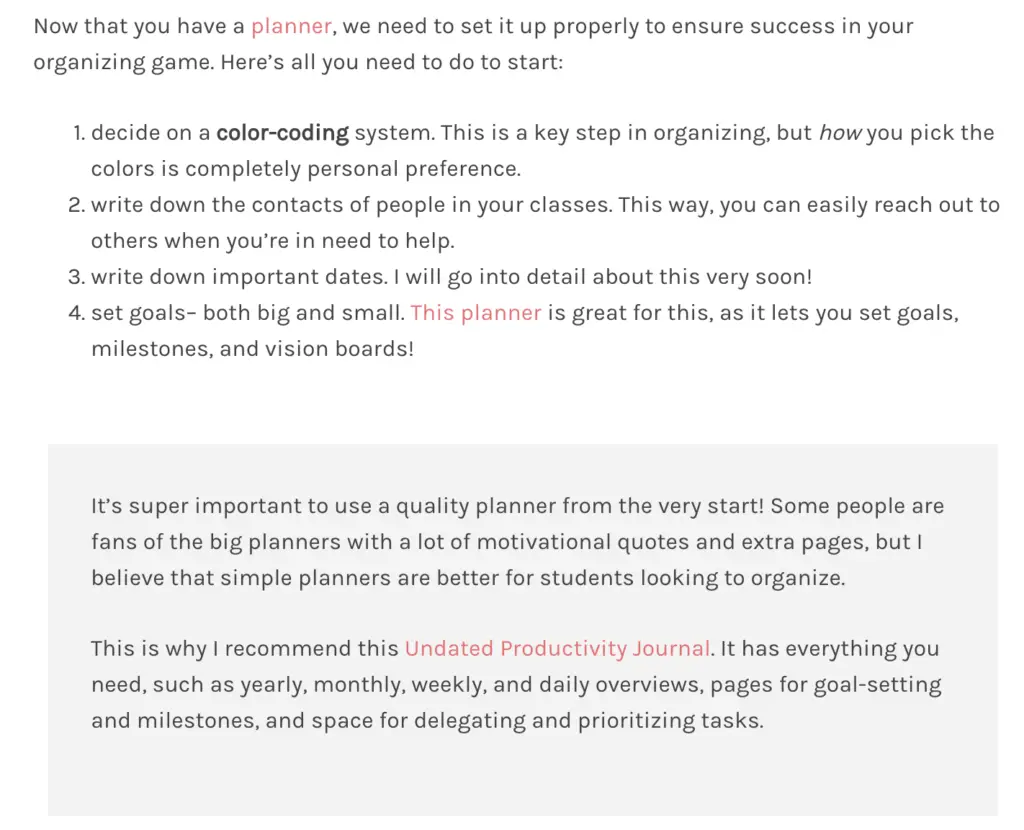
And that’s it! If your reader clicks through your link and buys a product, you get money! But don’t forget, you must write a disclosure at the top of your post! Check out my post for a reference.
Sponsored posts
The third most popular income source for bloggers is writing sponsored posts. When a blogger collaborates with a brand, that brand will send him/her a free product in exchange for a sponsored post. Often, the blogger gets paid an additional amount (ranging from a couple hundred to a couple thousand dollars).
As wonderful as that sounds, the actual collaborating part is hard to come by. Most brands prefer collaborating with bloggers who have a large amount of following, either on their blog or on social media.
This usually means at least 25,000+ sessions per month on your blog and over 1,000 followers on each social media. This is likely a long-term goal for beginner bloggers, so for now, focus on building that audience and following.
However, once you reach that threshold, you can find sponsorship opportunities through these services:
- AspireIQ
- Octoly
- Social Fabric
- Tap Influence
- Acorn
- Izea
- And many more…
Once you’re ready, go ahead and check these services out!
Selling your own products
The last income source I’m going to talk about and selling your own products.
Now, making your own products is relatively easy. You can create ebooks, digital downloads, e-courses, and more super quickly and effortlessly by using services like Canva.
But actually getting people to purchase your products is hard. Remember our sales funnel?
- Stage 1: Problem awareness
- Stage 2: Solution awareness
- Stage 3: Product awareness
- Stage 4: Product interest
- Stage 5: Product action
The actual selling process is much more complex than it looks. In this section, I’m going to teach you exactly how to implement this idea of a sales funnel to make a ton of sales. Let’s go step by step:
In Stage 1, your reader is aware of their own problem. For example, Joe might realize that he’s been very distracted and unproductive the past several weeks and needs something to help him become more productive.
Joe scrolls upon your blog post and reads your compelling title– How To Triple Productivity In Less Than 1 Day. Joe is instantly intrigued and clicks into your post.
In Stage 2, your reader is aware of a solution (hopefully by reading your blog post). Joe reads your blog post about how using a planner is the secret to tripling productivity, and now decides that he needs to get a planner.
In Stage 3, your reader is aware of your product. This step is a little more complex.
Let’s say that you created a 60-page downloadable planner to sell. You don’t want to shove that product in Joe’s face and ask him to check it out. Joe won’t buy it.
Instead, create a freebie that’s related to your product and create an email opt-in form for it. For example, you might take a couple of pages from your planner and make it a free, mini-planner. You then create an email opt-in form (like the one below) that lets your readers get that planner in exchange for their emails.
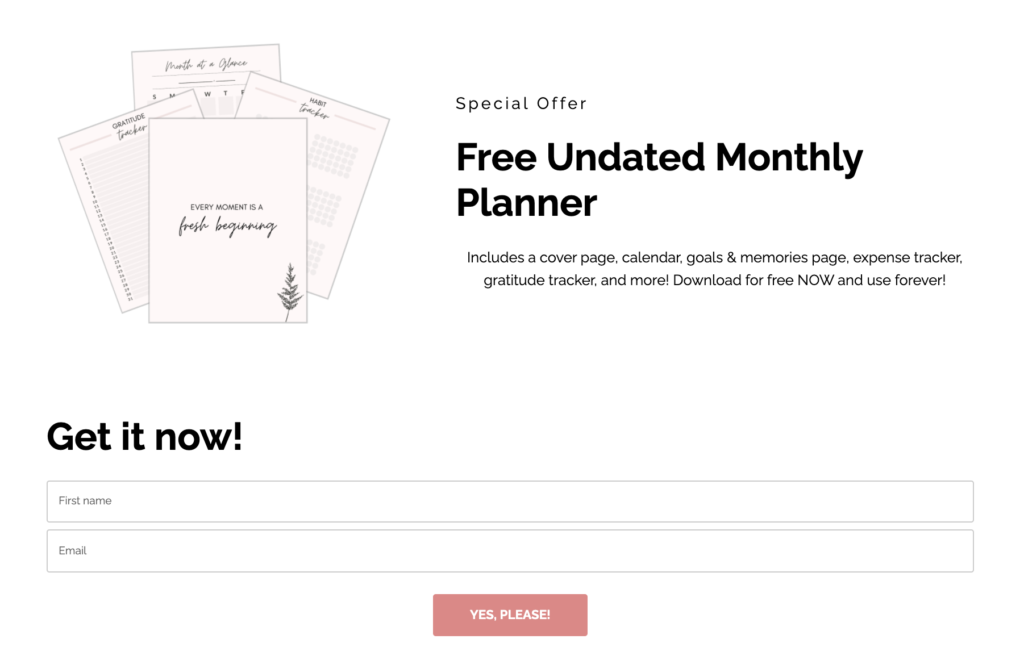
Joe finished your blog post and sees that he can get a planner for free just by entering his email, so he does. Now, Joe has a mini-planner, and you have Joe’s email.
In Stage 4, you nurture your subscriber to make them interested in your product. Over the next week, you send Joe emails to tell him all about planners and productivity. You introduce your product (the 60-page planner) and explain how it will change his life for the better. You even give him a discount because he’s a subscriber.
In Stage 5, your reader is utterly convinced that your product is the product they need, and they buy it. Sometimes, it takes a little push to make the sale. Other times, you won’t make the sale at all. And it’s okay! Not everyone in your email list is going to be a customer, but as long as you have a couple, you’re doing something right.
Step 9: Keep Learning
Congratulations, you’re almost at the end of this guide! Give yourself a big pat on the back, because phew that was a lot!
Now that you’ve launched your blog, written multiple pieces of high-quality content, promoted the heck out of them, and hopefully made some money… you’re ready to start blogging.
I’m not kidding!
The blogging journey is a long one, and you’ve only just taken your first couple steps of it. But don’t be stressed out! Even though this is a long path, it’s one you’re going to enjoy.
And in order to keep making the most out of your time and dedication, make an active decision to keep learning. I’m not exaggerating when I say that I probably learn something new about blogging every 3 days.
There are different ways to learn. Other than approaching your blog empty-handed and trying everything yourself, you can learn from the pros in this field. Experience is valuable, and when you don’t have it yet, gain some value from that of others!
Other resources
Shameless self-promo time!
If you’re looking for freebies, I’ve got you. In my exclusive Freebie Library, I have tons of free downloadables and templates for students and bloggers alike, including planners, blog post templates, content calendar templates, and more. Here’s a sneak peek:
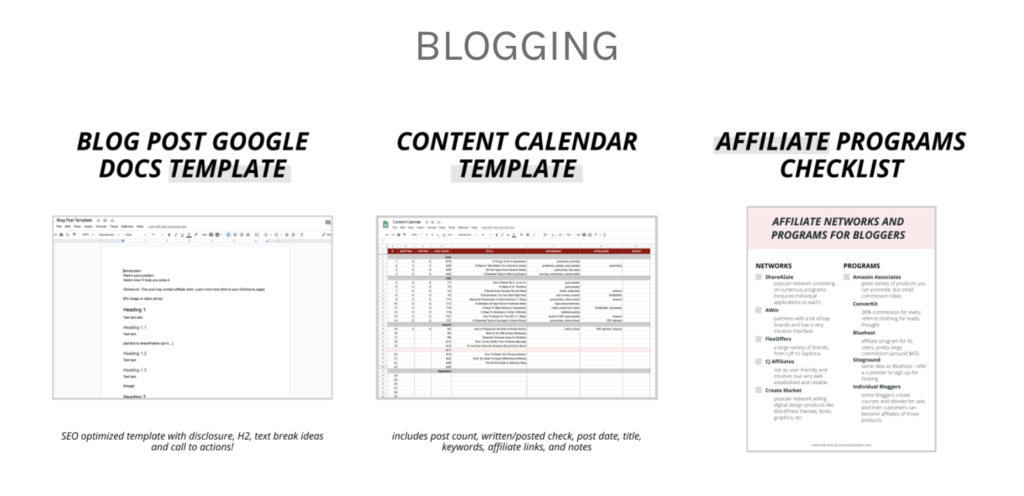
Doesn’t that look exciting? And you can access them for 100% free!
Conclusion
OMG, you made it!
And you should be proud of yourself, too! You’ve started your own blog! How crazy is that? In a couple of months or a couple of years (it differs for everyone, but you’ll get there for sure), you’ll become a real, money-making blogger!
I hope you found this guide helpful! Feel free to send me a message to tell me what you think or how I can improve this it.

